5
To Start and then Stop the Oven using the Timer
This is a semi-automatic function that allows you to set the
‘cook time’, which is the duration you want the oven to cook
for and the ‘stop time’, which is the time of day at which you
want the oven to stop cooking.
You cannot set a start time directly – this is set by a
combination of the ‘cook time’ and ‘stop time’.
Press the timer key for about 3 seconds. Press the key again
until ‘dur’ appears in the display (Fig.2-7). Using the ‘+’ and ‘–‘
keys, set the required ‘cook time’. Wait a few seconds for the
settings to be memorised.
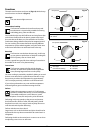
Press the timer key for about 3 seconds, then press the key
twice again until ‘End’ appears in the display (Fig.2-8). Using
the ‘+’ and ‘–‘ keys, set the required ‘stop time’.
Note: Make sure to set the temperature control to the correct
cooking temperature.
The oven will beep when it stops cooking. To stop the beeper
when it sounds, press any of the clock buttons.
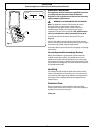
Adjusting the Beep Volume
To adjust the beep volume, press the ‘+’ and ‘–‘ keys
simultaneously, then press and hold the central timer button
until ‘ton 1’ flashes in the display (Fig.2-9). Press the ‘–‘ key to
scroll through the volume settings:
• Ton 1: High volume
• Ton 2: Medium volume
• Ton 3: Low volume
Press the central timer key to set the volume.
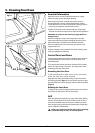
Oven Accessories
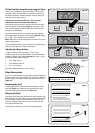
The oven is supplied with two wire shelves and an enamelled
grill pan, with a trivet and a handle. The wire shelves slide into
the wire supports located on either side of the oven interior
(Fig.2-10).
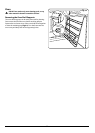
Removing the Shelf
Pull the shelf forward until the back of the shelf is up to the
shelf stop (Fig.2-11). Lift the front of the shelf so the stop
clears the wire support and pull clear (Fig.2-12).
Refitting the Shelf
To refit the shelf, line up the shelf with the shelf supports and
slide it between the two support wires until the shelf stop hits
the wire support. Lift the front of the shelf so that the stop
clears the support, then lower the front so that the shelf is
level and push it back fully.
The shelf guard should be at the back pointing upwards.
ArtNo.303-0005 Setting the end time
ArtNo.303-0006 Adjusting the beep volume
Fig.2-8
Fig.2-9
ArtNo.325-0033 Oven BI shelf
ArtNo.325-0034 - Fitting the shelf 1
ArtNo.325-0035 - Fitting the shelf 2
Fig.2-10
Fig.2-11
Fig.2-12
A – Shelf guard, B – Front, C – Shelf stop
Key