11
Reversing the Doors
The doors of your fridge-freezer can be set to open from the
left or the right. If you want the door to hinge on the left-
hand side and open from the right-hand side, then follow the
proecedure below.
This procedure MUST be completed before the
furniture door is attached.
When reversing a door, keep any parts that you remove from
the appliance for later use.
Take care when unscrewing any of the hinges: hold
the door to stop it from falling and causing damage.
Tools required:
• Phillips screwdriver
• Flat bladed screwdriver
• Pliers
Procedure
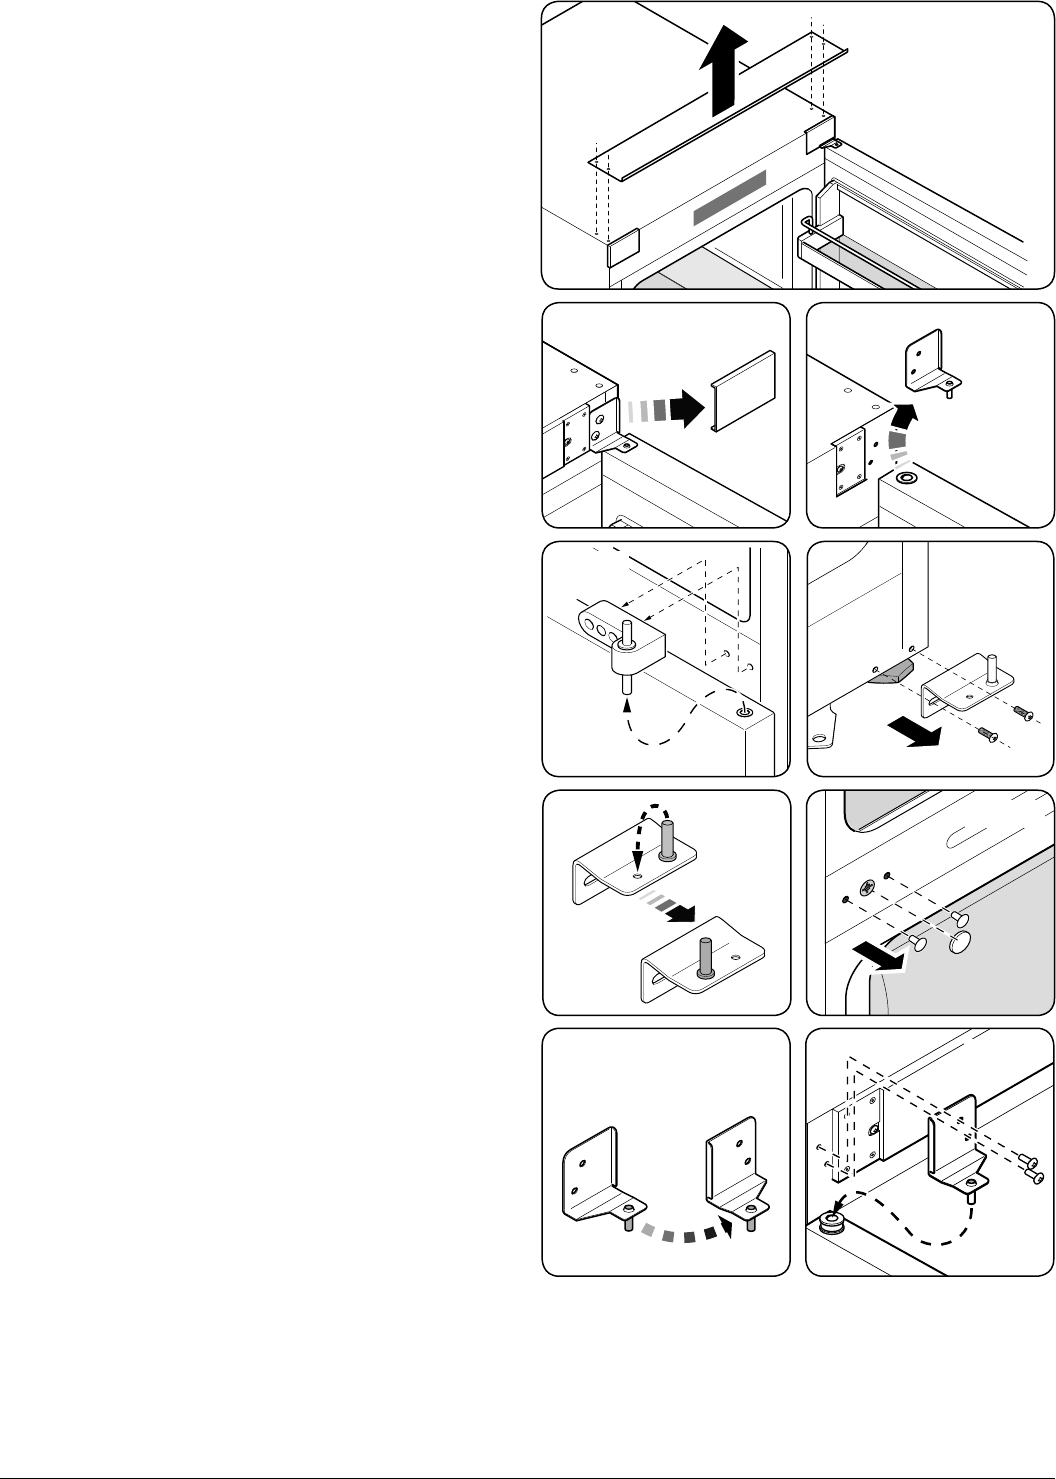
1.
Undo the screws in the top of the upper support bracket
and remove. Slide the support bracket forwards and
remove (Fig.4-2).
2. Using a suitable at bladed screwdriver, carefully lever
o the hinge cover cap (Fig.4-3).
3. Undo the upper hinge xing screws and remove the
hinge (Fig.4-4).
4. Remove the fridge door by lifting it up and away
from the middle hinge. To stop the door from being
damaged, place it on a cushioned surface.
5. Undo the middle hinge xing screws and remove the
hinge (Fig.4-5).
6. Remove the freezer door by lifting it up and away from
the lower hinge. To stop the door from being damaged,
place it on a cushioned surface.
7. Undo the lower door hinge screws and remove the
hinge (Fig.4-6). Remove the pin from the hinge and t
it into the left-hand hole (Fig.4-7). Re t the lower hinge
on the left-hand side.
IMPORTANT: The position of the hinge pin MUST be
changed from the right hole to the left hole.
8. Using a suitable at screwdriver, carefully remove the
screw cap and remove the screw hole covers (Fig.4-8).
Retain the screw cap and screw hole covers for use on
the opposite side of the appliance.
9. Re t the freezer door.
10. Re t the middle door hinge onto the left-hand side. Fit
the screw cap and screw hole cover to the right-hand
middle hinge position.
11. Take the upper hinge and remove the pin. Fit the pin to
the new left-hand hinge: this is in the xing kit (Fig.4-9).
12. Re t the refrigerator door and install the new door
hinge bracket (Fig.4-10).
13. Re t the upper support bracket.
Fig.4-3
Fig.4-2
Fig.4-4
Right-hand
hinge
Left-hand
hinge
Re-use the hinge pin
Fig.4-5
Fig.4-6
Fig.4-7
Fig.4-8
Fig.4-9 Fig.4-10


