


-7--6-
USING YOUR SLICER
SLICING TIPS
•To slice meats wafer thin, chill thoroughly before slicing.
• Meats should be boneless. Fruits should be free of seeds.
• Foods with an uneven texture – like fish and thin steaks-are often
difficult to slice. Partially freeze before slicing.
Hot Roasts: Beef, Pork, Lamb, Turkey, Ham
When slicing warm boneless roasts, remove from oven and let set 15-20
minutes before slicing. They will retain more natural juices and slice evenly
without crumbling. Cut the roast if necessary, to fit on food tray. If roast
is tied, turn off motor and remove strings one at a time as strings near
blade.
Extra-Thin Sliced Corned Beef or Fresh Beef Brisket
Chill cooked brisket overnight in cooking liquid. Before slicing, drain and
reserve meat drippings from brisket. Pat dry with paper towels. Remove
excess fat. Slice well-chilled brisket to desired thickness. To serve hot,
place slices on heatproof platter and moisten with small amount of
reserved meat drippings. Heat in 150°C (300°F) oven for 30 minutes.
Cheese
Chill thoroughly before slicing. Cover with foil to keep moist. Before serv-
ing, allow cheese to reach room temperature-this enhances the natural
flavor.
Cold Cuts
Cold cuts keep longer and retain flavor if sliced as needed. For best
results, chill first. Remove any plastic or hard casings before slicing. Use a
constant, gently pressure for uniform slicing.
Breads, Cakes and Cookies
Freshly baked bread should be cooled before slicing. Use day old or
slightly stale bread for extra thin slices for toasting. Your slicer is ideal for
all types of party breads, pound cake and fruit cake.
CARE AND CLEANING
• Never use steel wood or scouring powder on any part of slicer. Do not
wash any part of slicer in the dishwasher.
• Motor is concealed in housing. Never submerge in water. Motor never
needs oiling
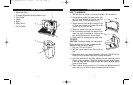
1. Unplug slicer from outlet.
2. Remove all slicing parts for thorough cleaning. Wash with a soft cloth
or sponge and a mild soap. Rinse and dry.
3. For easier cleaning, remove parts in order
shown below. Wash as directed and replace
in reverse order.
4. Slide food pusher off and lift food tray from
platform.
5. Fold up platform. Using one leg as a handle,
swing platform out from slot A and remove
from slot B (Fig 1).
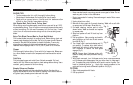
6. Turn blade hatch counterclockwise and lift
out carefully. To replace, align both tabs of
blade latch with slots of motor housing and
turn clockwise to secure. Be sure gears
engage (Fig 3).
NOTE: Always align thickness guide with
blade for safety and blade protection during
storage.
7. With blade removed, turn thickness control knob counterclockwise
until thickness guide disengages. Use your other hand to help ease it
out. To replace, set guide in position with hand in center of guide. Turn
knob to indicated position . Apply light, steady pressure to the
guide while turning knob clockwise to position .(Fig 4)
TO STORE:
1. Align thickness guide with blade.
2. Fold up platform.
Fig. 3
Fig. 4
O
1042-WN05EM1.qxd 5/18/05 1:47 PM Page 7