


-5--4-
BEFORE FIRST USE
• Wash the BASE and LID in warm soapy water. Rinse and dry thoroughly.
CAUTION: Do not wash or immerse TEMPERATURE CONTROL PROBE.
• Before using the skillet for the first time, condition the non-stick cooking
surface by lightly brushing the cooking surface with vegetable oil. Heat,
uncovered, to 300° F. Turn to “OFF” and cool completely. Wipe away
excess oil.
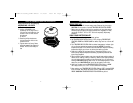
USING YOUR ELECTRIC SKILLET
1. Set the skillet on a flat, dry, heat resistant surface.
2. Set TEMPERATURE CONTROL DIAL to “OFF” and plug TEMPERATURE
CONTROL PROBE into PROBE GUARD on skillet. Plug cord into 120 volt AC
outlet.
3. Turn TEMPERATURE CONTROL DIAL to desired temperature. Indicator light
will go off when selected temperature is reached. NOTE: The cooking
temperatures listed in this Owner‘s Guide are estimates. Adjust the cooking
temperature slightly up or down to achieve the results you prefer.
4. Place food in skillet and cook according to Temperature Guide or your
favorite recipe. Adjust temperature according to personal preference and
type of food prepared.
5. Use the LID and close the steam vent when a moist-heat cooking method is
desired, as for roasting, braising or steaming. When a drier heat is preferred,
you may wish to open the steam vent during the last 10 to 15 minutes of
cooking. CAUTION: Escaping steam is hot! To avoid escaping steam, lift LID
away from you. CAUTION: Skillet is hot! Use hot pads or oven mitts.
6. After food is cooked, set the TEMPERATURE CONTROL DIAL to “WARM”
until ready to serve, or to “OFF” if food is removed immediately.
7. After cooking, turn TEMPERATURE CONTROL DIAL to “OFF”. Unplug CORD
from wall outlet. After skillet has cooled, remove TEMPERATURE CONTROL
PROBE. CAUTION: TEMPERATURE CONTROL PROBE may be hot.
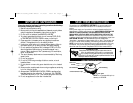
HOW TO USE YOUR ELECTRIC SKILLET
Remove all parts from the packaging.
ASSEMBLING LID KNOB
1. Find lid and lid knob.
2. Holding LID KNOB on the
outside top of LID, align hole in
lid knob into hole located on the
outside of the lid. Knob should
be centered
on the lid.
3. Place the phillips head screw
through the screw hole on the
inside of the lid.
4. Tighten screw until snug. Screw
should be seated flush against lid
surface. The lid is now ready for
use.
HOW TO ASSEMBLE YOUR ELECTRIC SKILLET
S12WN.01.US.OM1_S12WN Manual 11/21/01 12:01 PM Page 4