12
STEAMING FOOD
GENERAL INFORMATION
Keep the Glass Lid on while cooking or steaming food, unless the
recipe or chart specially calls for removing it. By removing the Glass
Lid unnecessarily, you lose steam and valuable time. If you must
remove it to stir or to add an ingredient, have the Rice Paddle or
ingredient ready, add it, stir quickly and just as quickly replace the
Glass Lid.
USING THE WIRE STEAMING RACK
When steaming vegetables, the Wire Steaming Rack is a
convenient accessory.
1.Clean and prepare your vegetables.
2.Place the Cooking Pot into the Rice Cooker Heating Body. The
length of steaming time is subject to your own personal tastes;
do you prefer al dente (crunchy) steamed vegetables or a
softer consistency?
3.Place the Wire Steaming Rack into the Cooking Pot and add
enough water to be level with the top of the Wire Steaming Rack.
4. Place a heat-resistant container onto the Wire Steaming Rack. Or,
a steaming basket may be placed directly into the Cooking Pot.
5.Add small vegetables to the heat-resistant container or the
steaming basket. Larger vegetables can be placed directly onto
the Steaming Rack. Replace the Glass Lid.
6.Plug the cord into a 120V AC electrical outlet. The POWER
ON/WARM Light will illuminte. Press the Rice Cooking Selector
Lever down to the COOK position. The COOK Light will
illuminte. Steaming will start shortly.
7.Allow vegetables to steam to desired doneness. See Vegetable
Steaming Chart. Periodically check water level so Pot does not
boil dry.
8. The Rice Cooker may automatically switch to WARM. If
additional cooking is desired, unplug the unit and add more
water. Replace the Glass Lid. Plug in the Rice Cooker, press the
Rice Cooking Selector Lever down to COOK position and your
Rice Cooker will resume steaming.
9. When your food has reached the desired doneness, raise the Rice
Cooking Selector Lever to WARM and unplug after use.
7
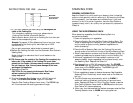
7.Or, you may measure the water using the markings on the
inside of the Cooking Pot.
*For information regarding rinsing rice, please refer to
Cooking Rice General Information Section.
(See illustration above.) Add rice to Cooking Pot first. then add
water to the corresponding level.
Example: To prepare 12 Rice Measuring Cups of raw rice, rinse
rice and add to the Cooking Pot; add water up to LEVEL
INDICATOR 12.
(As you gain experience, adjust water to personal taste.)
8.Replace the Cooking Pot back into the Automatic Rice Cooker’s
Heating Body.
Rotate it slightly to make sure that it is well seated on the
Heating Plate.
NOTE: Always wipe the outside of the Cooking Pot completely dry
before use. If the outside of the Cooking Pot is wet when
placed into the Cooker, this may cause a cracking noise while
the unit heats up. Also, this may cause damage to the inner
workings of the appliance.
9. Replace the Glass Lid.
CAUTION: Do not operate the Automatic Rice Cooker
without replacing the Lid. Burns or other serious
injury may occur.
10. Plug the Automatic Rice Cooker into a 120V AC electrical
outlet. The POWER ON/WARM Light will illuminate.
Press the Rice Cooking Selector Lever down. The COOK Light
will illuminate and the cooking process will begin.
MAX LEVEL
Do not add water
above this Line.
INSTRUCTIONS FOR USE (Continued)


