


FILTER CARTRIDGE / USEFUL LIFE / REPLACEMENT
FILTER CARTRIDGE LIFE
Several variables determine how long a cartridge wilt
last These include:
1. how much water' you use
2. how much sediment, taste and/or odor', or other un-
wanted substance, is in the water'
Use the following information as a guide. However;
no matter' which type of cartridge you are using, you
will know it is time to replace it when you first no-
tice the return of the unwanted substance in your
water.
Sediment Cartridges: Average cartridge life, when
filtering water to 1 faucet, is about 6 months This aver-
age time varies depending on the type of' sediment
caruidge.
Filtering sediments, you will know it's time to replace
the cartridge wizen water pressure to the faucet drops
Taste and Odor Cartridges: Filtering water to a
single faucet, the filter cartridge may last fbr 6 months
or' more If the cartridge is also for' lead or chemical
contaminant removal, it is more important to replace
it frequently.
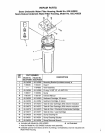
FILTER CARTRIDGE REPLACEMENT
CAUTION: Never remove the sump with water
pressure in the falter.
1. Close the nearest shutoff valve on the water
supply pipe to the filter. To relieve pressure in
the _ter, open the sink cold water faucet, or press
the vent valve (Deluxe models - some water may
leak out) on the top of the head
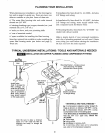
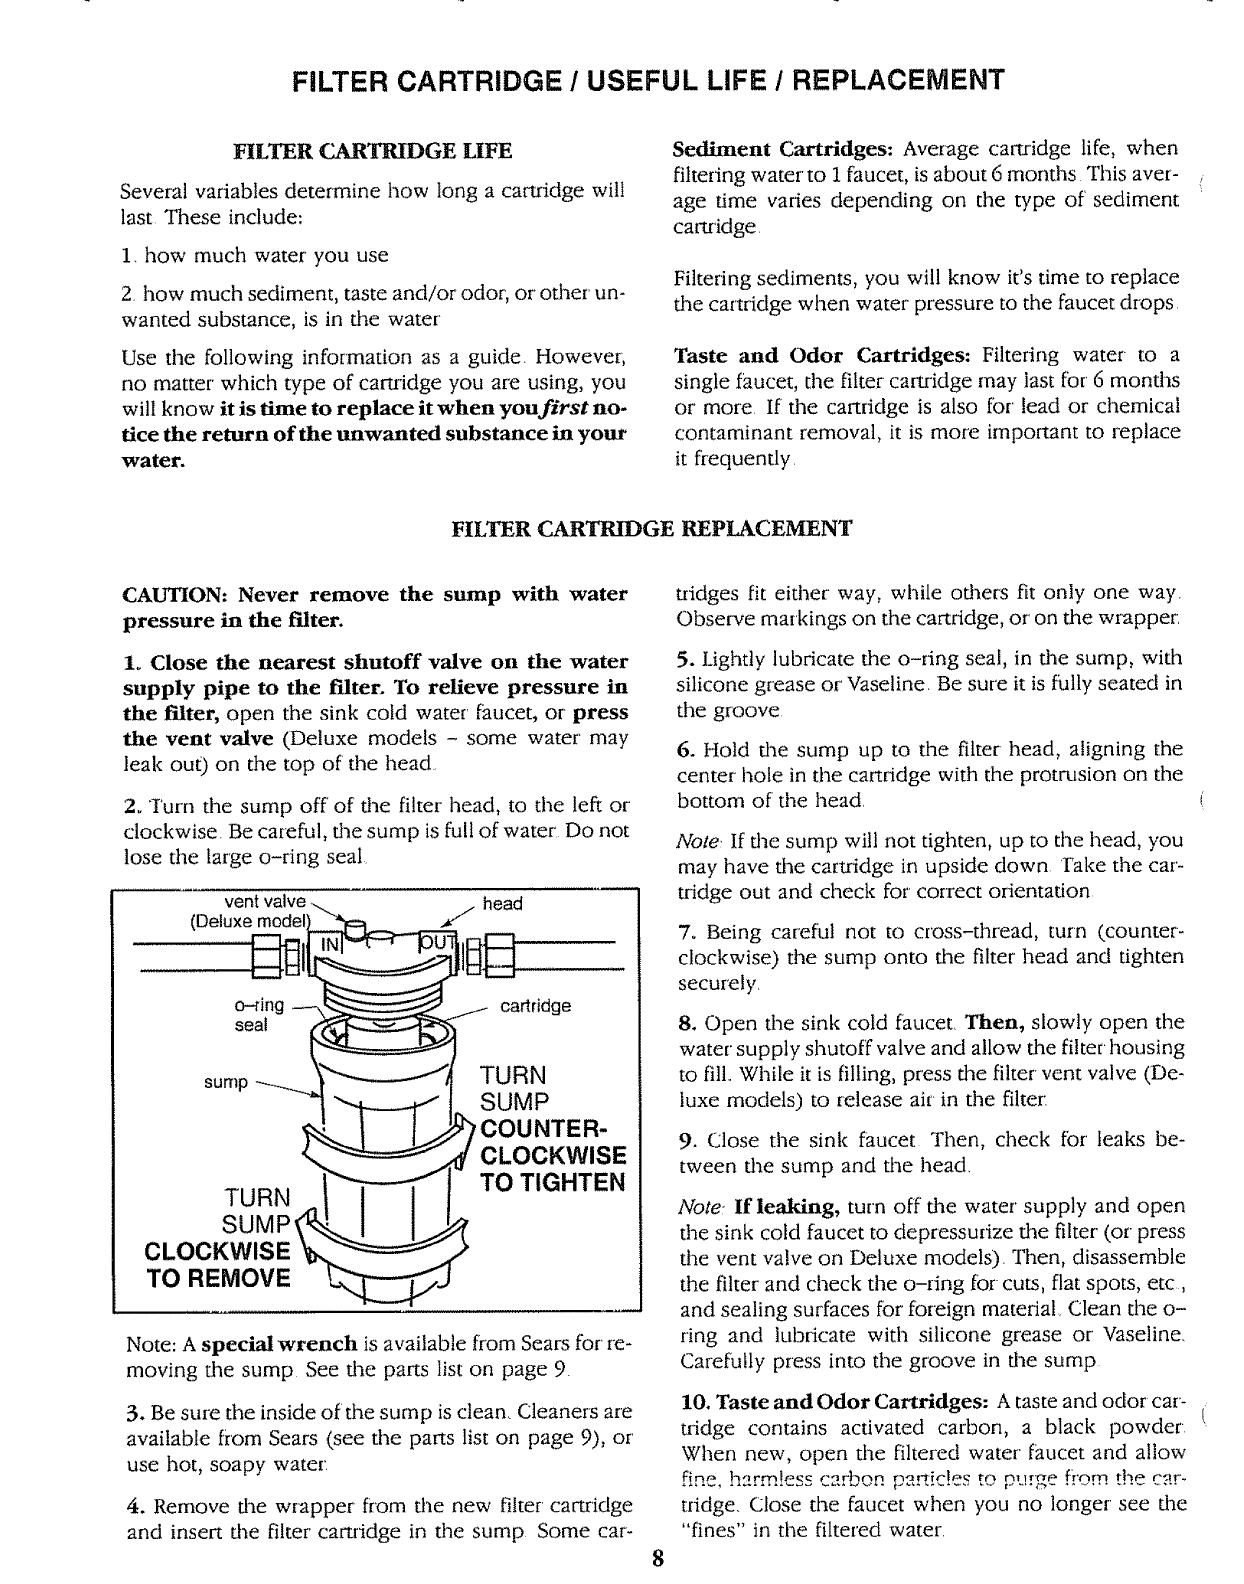
2. Turn the sump off' of tile filter head, to the left or
clockwise. Be careful, the sump is full of water' Do not
lose tile large o-ring seat
TURN I I
SUMP ._! !t.
CLOCKWISE __
TO REMOVE %_..I
TURN
SUMP
COUNTER-
CLOCKWISE
TO TIGHTEN
Note: A special wrench is available from Sears for m-
moving the sump See the parts list on page 9.
3. Be sum the inside of the sump is clean.. Cleaners are
available from Sears (.see the parts list on page 9), or
use hot, soapy water:
4. Remove the wrapper' from tile new filter cartridge
and insert the filter' cartridge in the sump Some car-
8
tridges fit either way, while others fit only one way,
Observe markings on the cartridge, or' on dae wrapper:
5. Lightly lubricate the o-ring seal, in file sump, with
silicone grease or' Vaseline_ Be sure it is fully seated in
the groove
6. Hold the sump up to the filter head, aligning the
center hole in the cartridge with the protrusion on the
bottom of the head
Note: If d_e sump will not tighten, up to the head, you
may have the cartridge in upside down Take the car-
tridge out and check for correct orientation
7. Being careful not to cross-thread, turn (counter-
clockwise) tile sump onto the filter head and tighten
securely,
8. Open the sink cold faucet, Then, slowly open the
water supply shutoff valve and allow dae filter housing
to fill..While it is filling, press tile filter vent valve (De-
luxe models) to release air in the filter:
9. Close the sink faucet Then, check fbr' leaks be-
tween the sump and the head.
Note: If leaking, turn off the water' supply and open
the sink cold faucet to depressunze die filter' (or press
the vent valve on Deluxe models). Then, disassemble
the filter' and check the o-ring for cuts, flat spots, etc,
and sealing surfaces for' foreign matedal_ Clean the o-
ring and lubricate with silicone grease or Vaseline.
Carefully press into the groove in d_e sump
10. Taste and Odor Cartridges: Ataste and odor car-
tridge contains activated carbon, a black powder
When new, open the filtered water' faucet and allow
fine, h__rmIess carben pa_ic!es to pu:ge f.,'om tb.e c_r'-
tridge. Close the faucet when you no longer see the
"fines" in the filtered water.