


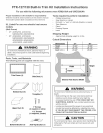


FTK-127i130 Buitt-in Trim Kit installation instructions
For use with the following microwave oven ACM2160A and UMC5200AA
hetallation of Bottom Bracket
1= Disconnect power from microwave oven before
proceeding with installation=
2= Remove any loose items from inside the microwave
oven,
3= Remove any oil or dirt on the surface of the microwave
oven where ductwork will be secured.
4= Peel off the protected backing on the double sided
tape.
5= Place the existing screw through the ductwork and
start securing the screw DO NOT TIGHTEN. Slowly
push the ductwork towards the microwave keeping
proper alignment of the ductwork= Press down firmly to
secure the ductwork and tighten the screw securely.
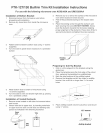
3. Fasten bottom bracket to bottom duct using 1/2"screws
(supplied).
4. Turn microwave upside down and place on a protected
surface.
Fo _ oq
Fr°nt _o____l \\
5= Attach bottom duct to bottom of microwave using
1/2Tscrews (supplied)=
6= Turn microwave oven and bracket right side up, placing
it on a protected surface.
hetaHation of Vented Ductwork
1= Remove screw located on left side of microwave below
vent louvers.
2= Secure side duct to upper duct, by inserting metal tabs
on upper duct into slots on side duct and bending tabs
upward as indicated in the following illustration=
Upper Tabs
duct
Existin_._
screw
Preparing for Anti-Tip Bracket
1= Fold or cut the edges from the template a!ong the
guide lines.
2= Place the template along the front edge of the cutout
floor, centering the template from sideStoSside=
3= Mark the hole positions of the antiStip bracket.
4= Remove the template and drill two holes for antiStip
bracket. Use a drill bit no larger than 7/64tto make
holes=
5= Place antiStip bracket onto the cutout floor and secure
using 1/2"screws.
1/2" screws
Side
duct
Anti-tip bracket