


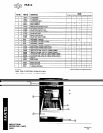
MAINTENANCE
FRY KETTLE CLEANING WEEKLY:
1. Follow steps 1, 2, 3 and 4 above.
2. Close drain valve and fill kettle with a solution of warm water and a strong detergent or other
strong cleanser.
3. Relight the fryer and bring the solution to a gentle boil for at least five minutes.
4. Turn off main burners and let the solution stand until the gum deposits are softened and the
carbon spots and burned grease spots can be rubbed off.
5. Scrub the kettle walls and heat tubes, then drain out kettle and rinse it with clean water mixed
with two ounces of vinegar per gallon.
6. Refill the kettle with clean water
and
boil again.
7. Turn off gas and drain and rinse well until clean.
8. Wipe dry with a clean cloth.
9. Refill as specified in section “FILLING THE FRY KETTLE.”
OTHER CLEANING MONTHLY:
1. Clean around burner air mixer and orifices if lint has accumulated.
2. Visually assure carry-over ports are unobstructed.
Following daily and periodic maintenance procedures will enhance long-life fir your equipment. Climatic
conditions - salt air - may require more thorough and frequent cleaning or the life of the equipment
could be adversely affected
BLACK BAKED ENAMEL:
Allow equipment to cool after use and wash exterior with .a hot, mild
detergent or soap solution; particularly clean off all grease deposits. Dry thoroughly with a dry cloth.
STAINLESS STEEL:
To remove normal dirt, grease, or product residue from stainless steel use
ordinary soap and water (with or without detergent) applied with a sponge or cloth. Dry thoroughly
with a clean cloth. Never use vinegar or any corrosive cleaner.
To remove grease and food splatter or condensed vapors that have baked on the equipment, apply
cleanser to a damp cloth or sponge and rub cleanser on the metal in the direction of the polishing
lines on the metal. Rubbing cleanser as gently as possible in the direction of the polished lines will
not mar the finish of the stainless steel. NEVER RUB WITH A CIRCULAR MOTION. Soil and burnt
deposits which do not respond to the above procedure can usually be removed by rubbing the surface
with SCOTCH-BRITE scouring pads or STAINLESS scouring pads DO NOT USE ORDINARY STEEL
WOOL, as any particles left on the surface will rust and further spoil the appearance of the finish.
NEVER USE A WIRE BRUSH, STEEL SCOURING PADS (EXCEPT STAINLESS), SCRAPER, FILE
OR OTHER STEEL TOOLS. Surfaces which are marred collect dirt more rapidly and become more
difficult to clean. Marring also increases the possibility of corrosive attack. Refinishing may then be
required.
TO REMOVE HEAT
TINT: Darkened areas sometimes appear on stainless steel surfaces where
the area has been subjected to excessive heat. These darkened areas are caused by thickening of the
protective surface of the stainless steel and are not harmful. Heat tint can normally be removed by
the foregoing, but tint which does not respond to this procedure calls for a vigorous scouring in the
direction of the polish lines using SCOTCH-BRITE scouring pads or a STAINLESS scouring pad in
combination with a powdered cleanser. Heat tint action may be lessened by not applying, or by
reducing, heat to equipment during slack periods.
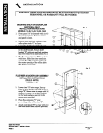
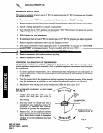
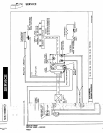
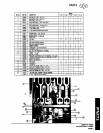
VENT
SYSTEM:
At least twice a year the unit venting system should be examined and cleaned.
GAS SAVING TIPS:
Use these reminders to help develop energy-saving procedures and habits Using less natural or
propane gas saves energy, and money too.
1.
Limit preheat time to 5-10 minutes
2. Set thermostat at desired temperature.
3. Do not overheat. Never use temperatures higher than 375°F.
4. Turn fryers off during slack periods.
5. Filter oil daily. Clean fryer kettle thoroughly at least once a week.
USER TIPS:
1. Smoking fat means temperature is too high or fat is broken down.
2. Gum in kettle denotes need for thorough cleaning.
3. Use different fat for oily foods (mackerel, nutmeg, etc.) than for foods with water soluble flavors
(potatoeg onions, etc).
4. Taste fat for quality. Replace it regularly.
5. Poor fat cannot produce good food.
DEEP FAT FRYER
SECTION TWO
- USER’S GUIDE
Liiho in U.S.A.
PAGE 6
2-94