


MODEL 300 RESTAURANT RANGES ADJUSTMENTS
ALL TOP BURNERS
All burners have a primary air adjustment by means of an air shutter on the mixer face.
Loosen screw and rotate mixer cap until a clear, stable blue flame is obtained. The flame should not be
yellow tipped nor should it blow off the burner ports.
All orifice sizes and burner rate are properly set at the factory and should not be altered.
Over-rated burners cause poor burner and pilot performance, resulting in less heat, and wasted gas.
Over-gassed burners DO NOT heat the hot-top or griddle as efficiently as those that are properly adjusted.
Such conditions also create “hot spots” on griddles. Floating and unstable burner and pilot flames will result
when solid tops are lowered into position because the rear openings of the burner compartment are not
adequate to vent the enormous flue products generated by over-gassed burners. The “unburned” gas will
ignite at the rear and burn in this section and even up inside the backguard or shelf venting system, causing
structural members in this area to deteriorate. Also, some of these hot flue products will vent forward into the
manifold compartment resulting in problems with valves and thermostats due to overheating. AGAIN, over-
rated burners waste energy and cause service problems.
OVEN STANDING PILOT
The standing oven pilot flame can be adjusted by turning the adjusting screw on the pilot line valve with a
screwdriver. The pilot line valve is located behind the front panel below the oven door. Remove the front
panel to gain accessibility. The pilot flame is properly adjusted when it is just large enough to maintain a
glowing red color of the flame switch capillary bulb.
OVEN BURNER FLAME
The oven burner orifice is of the fixed type, sized for the respective gas supply. The burner flame
characteristics are controlled by varying the primary air mixer cap. There should be a clear blue flame with a
distinct inner cone at each port. Excessive primary air can result in “blowing” or the flames leaving the ports.
Lack of primary air causes soft or yellow tipped flame.
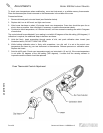
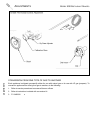
OVEN BY-PASS FLAME LEVEL
When the oven reaches the temperature at which the dial is set, the oven control cuts down the flow of gas
to the amount required to keep the oven at that temperature. Always, however, the control must by-pass
enough gas to keep the entire burner lighted. To maintain this minimum flame, the by-pass must be set
carefully and accurately, as follows (see illustration on page 26):
ADJUSTMENTS
1. Light the oven burner, then turn dial to “Broil.”
2. After 5 minutes, turn dial clockwise to point slightly beyond first mark on dial.
3. Remove dial and bezel.
4. With a screwdriver, turn by-pass Adjustor (counterclockwise to increase the flame, clockwise to decrease
it) until there is a flame approximately 1/8" high over the entire burner.
5. Replace bezel and dial, turning the dial clockwise until it locks in the “Off” position.
OVEN THERMOSTAT CALIBRATION
The oven control is carefully calibrated at the factory—that is, it is so adjusted that dial settings match actual
oven temperatures. Field recalibration is seldom necessary, and should not be resorted to unless
considerable experience with cooking results definitely proves that the control is not maintaining the
temperatures to which the dial is set.
Recalibration should not be undertaken, however, until the oven by-pass flame has been adjusted.
OPERATOR’S MANUAL 1182298 REV 3 PAGE 25