


INSTALLATION STRATOSTEAM COUNTERTOP STEAMER
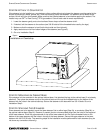
STEP 1: UNPACKING
IMMEDIATELY INSPECT FOR SHIPPING DAMAGE
All containers should be examined for damage before and during unloading. The freight carrier has assumed
responsibility for its safe transit and delivery. If damaged equipment is received, either apparent or concealed, a
claim must be made with the delivering carrier.
Apparent damage or loss must be noted on the freight bill at the time of delivery. The freight bill must then be
signed by the carrier representative (Driver). If the bill is not signed, the carrier may refuse the claim. The carrier
can supply the necessary forms.
A request for inspection must be made to the carrier within 15 days if there is concealed damage or loss that is not
apparent until after the equipment is uncrated. The carrier should arrange an inspection. Be certain to hold all
contents plus all packing material.
Do the following:
1. Cut the banding straps and remove the corrugated cardboard surrounding the steamer. If legs were shipped in
the same container, set them aside for installation in later steps of this procedure. Do not remove any tags or
labels attached to the steamer until the steamer is installed and working properly.
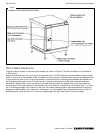
2. If the steamer was shipped on a wooden skid, cut the banding strap holding the steamer to the wooden skid,
unbolt the shipping hold-down brackets from the skid, then remove the brackets from the steamer.
3. If the steamer is to be installed on legs, go to Step 2a.
If the steamer is to be installed without legs on a countertop, go to Step 2b.
If the steamer is to be mounted on the optional cabinet base, go to Step 2c.
If two steamers are to be stacked, go to Step 2d.
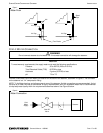
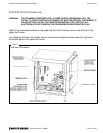
STEP 2A: ATTACH LEGS
A set of four legs is packed with steamers ordered with legs.
A threaded hole is located at each corner. Each leg has a corresponding mating thread. The legs can be adjusted to
overcome a slightly uneven surface.
1. Raise the steamer sufficiently to allow the legs to be attached. For safety, “shore up” and support the steamer
with an adequate blocking arrangement strong enough to support the load.
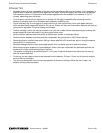
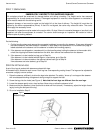
2. Screw the legs into the holes (see Figure 4). Note that the front legs are different than the rear legs.
3. Lower the steamer gently onto a level surface. Never drop or allow the steamer to fall.
4. Make sure that the steamer is level (both side-to-side and front-to-back). If necessary, adjust the height of each
leg by turning the foot-pad of the leg.
5. Go on to Installation Step 3.
Figure 4
Attach Legs
PAGE 14 OF 50 OWNER’S MANUAL 1185290