


11
4.1 ROUTINE CLEANING
To remove spilled or dried mix from the freezer exterior,
simply wash in the direction of the finish with warm
soapy water and wipe dry. Do not use highly abrasive
materials as they will mar the finish.
4.2PREVENTATIVE MAINTENANCE
It is recommended that a maintenance schedule be
followed to keep the freezer clean and operating prop-
erly.
WARNING
NEVER ATTEMPT TO REPAIR OR PERFORM
MAINTENANCE ON FREEZER UNTIL THE MAIN
ELECTRICAL POWER HAS BEEN DISCON-
NECTED.
A. Daily
1. The exterior should be kept clean at all times to
preserve the lustre of the stainless steel. A mild
alkaline cleaner is recommended. Use a soft cloth or
sponge to apply the cleaner.
B. Weekly
1. Check “O” Rings and rear seal for excessive wear
and replace if necessary.
2. Remove the drip tray and insert. Clean the drip
tray and insert and front of the freezer with a soap
solution.
C. Monthly
CAUTION
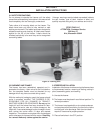
THE FREEZER HAS AN AIR COOLED CON-
DENSER AND MUST HAVE PROPER AIR CIRCU-
LATION. FAILURE TO CLEAN THE CONDENSER
ON A REGULAR BASIS MAY RESULT IN SERI-
OUS FREEZER DAMAGE AND COULD VOID
FREEZER WARRANTY.
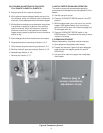
1. Visually inspect the condenser for dirt by shining a
light through the coil from the fan side of the con
denser.
2. If the condenser is dirty, using compressed air or
CO2 tank, blow out the dirt from the fan side of the
condenser.
3. An alternative method of cleaning the condenser is to
use a condenser brush and vacuum.
NOTE
If the condenser is not kept clean, loss of refrigera-
tion efficiency will result, causing extended run time
or soft product consistency.
4.3 EXTENDED STORAGE
Refer to the following steps for storage of the freezer
over any long period of shutdown time:
A. Turn CLEAN/OFF/SERVE switch to the OFF posi-
tion.
B. Disconnect (unplug) from the electrical supply
source.
C. Clean thoroughly with a warm detergent all parts that
come in contact with the mix. Rinse in clear water
and dry all parts. Do not sanitize.
NOTE
Do not let the cleaning or sanitizing solution stand
in the hopper or in the freezer barrel during the shut-
down period.
D. Remove, disassemble, and clean the front door, and
agitator parts. Place the agitator blades and the front
agitator support bearing in a plastic bag with a moist
paper towel to prevent them from becoming brittle.
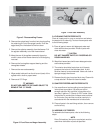
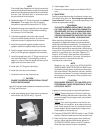
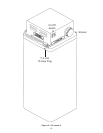
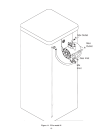
4.4 CONSISTENCY ADJUSTMENT
The consistency adjustment knob is located behind the
right side panel near the back. Remove black plug to
access. To adjust use a straight bladed screwdriver.
Turn clockwise for a thicker product and counterclock-
wise for a thinner product. Allow 15-30 minutes for the
product to change consistency.
SECTION 4
PREVENTIVE MAINTENANCE