


subzero.com
|
15
MODEL 427G / 427RG INSTALLATION
DRAWER PANELS (MODEL 427RG)
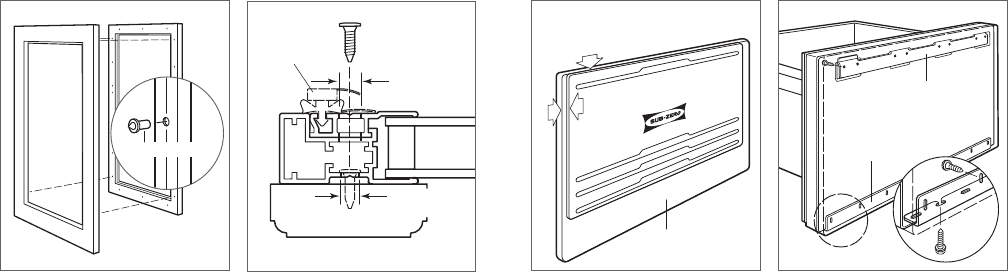
Remove the mounting hardware attached to the front of the
unit and set aside. Place the panel face down on a pro-
tected work surface.
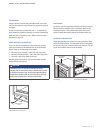
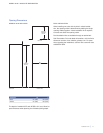
Position the top edge of the template ush with the top
edge of the panel. Depending on the height and thickness of
the lower drawer panel, the bracket may need to be inverted
for proper placement. Mark and drill pilot holes, then secure
brackets to panel using the #8 x
1
/2" screws provided. Refer
to the illustration below.
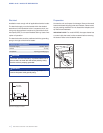
To help with placement of drawer panels, examine the lower
L-bracket and panel to determine the slotted holes on the
bracket that will be used. Then position screws into the
lower portion of the drawer that correspond with these slots.
Leave the screws out slightly so the slotted holes will slide
under the heads.
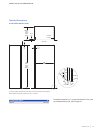
Install the panel by engaging the tabbed bracket to the top
of the drawer, then rotate the panel until the lower bracket
is properly positioned below the drawer. The panel can be
adjusted
1
/4" (6) up and down and side to side.
Once the panel is properly aligned, attach the remaining
#10 x
1
/2" screws to the mounting bracket.
Reconnect the control cable before reinstalling the top
drawer. Refer to page 12.
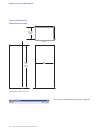
BACK OF PANEL
TEMPLATE FLUSH WITH
TOP OF PANEL
SIDE
EDGE GAP
WILL VARY
TABBED BRACKET
L BRACKET
Template position.
Drawer panel installation.
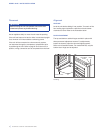
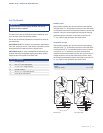
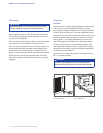
Panel Installation
The custom overlay door panel is attached using screws
provided through the door frame. Screw locations are
marked on the back of the custom panel using tenon cen-
ters inserted into holes of the door frame.
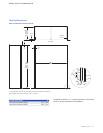
With the unit secured and door closed, hold the custom
panel in desired position on the door. Lightly tap the front
of the panel to locate mounting positions. Remove tenon
centers. Refer to the illustration below.
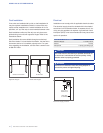
The door frame has mounting holes to accommodate
Sub-Zero accessory handles. If handle mounting holes are
not utilized, the handle should be attached to the custom
panel prior to mounting. Screw heads may need to be coun-
tersunk into the panel for proper alignment.
To mount the custom panel, open the door and use pre-
drilled holes to position the panel. Drive screws into the
panel through black tape on the door frame. Screw holes
are hidden behind the door gasket. Use as many screws as
necessary to secure the custom panel. Refer to the illustra-
tion below.
Adjustments can be made to the custom panel with a few
mounting screws in place, but not fully tightened. Once the
proper position is achieved, install and secure all screws.
Cover holes on the inside of the door frame with the cover
patches or plugs provided.
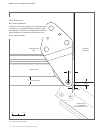
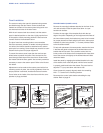
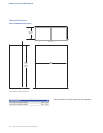
GASKET
GLASS
13
/32" (11)
DIAMETER
1
/4" (6)
DIAMETER
Tenon center.
Door frame cross section.
DOOR
FRAMEPANEL
TENON CENTER