


COOKTOP OPERATION
Section Four: Using the Cooktop
• Adjust control knob to lower set-
tings in small steps.
If control is set too low to main-
tain simmer, bring the food back
to a boil before setting a higher
simmer setting.
WHAT TO EXPECT
• The type and quantity of the food
will affect which setting to use.
• Thesize, typeandmateria] ofyour
pan will affect which setting to
use.
When a large pan is used on a
small burner, it may cause the
simmer action to occur mainly in
the center of the pan. When the
food is stirred, the cooler food
near the edges of the pan may
result in an overall temperature
too cool to simmer. If this hap-
pens, turn the burner up slightly.
It is normal to stir food occasion-
ally. This is especially important
when simmering for several
hours. For example: a homemade
spaghetti sauce or beans.
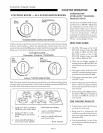
• It is normal not to see simmer
bubbles immediately after the
food has been stirred.
While the flame is ON there may
be bubbling; there should be at
least steam and a slight quivering
of the liquid's surface.
• Simmer bubbles may not be seen
when the flame has cycled OFF.
(Models GGS & SGS)
SIGNAL LIGHT
The Signal Light (not on all models),
or "ON" Light is located in the area of
the Control Knobs. For location see
"Section Three: Description", located
on pages 7 to 9, to identify your model.
This light turns on when any Control
Knob is set.
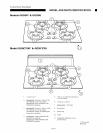
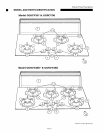
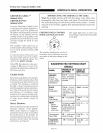
SEALED BURNERS
Front of Burner
SEALED BURNER
Your new cooktop features tour or
five sealed gas burners. On Mod-
els GGS30/36/365, GGSCV30/
36/365, SGS30/30G and
SGSCV36G you have two 9,100
BTU/HR burners, two 11,000
BTU/HR burners and on the
GGSCV365 or GGS365 there is
one 6,500 BTU/HR burner. On
Models GGN30/36/365 and
SGN30/36 there are two 11,000
BTU/HR and two or three 6,500
BTU/HR burners. Each burner is
sealed to the cooktop for easier
cleaning.
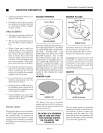
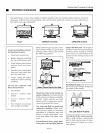
BURNER CAPS
f
BURNER CAP
M ,J
The Burner Cap top is porcelain
enamel and has a tab (A) on the un-
derside that fits into the notch (B) on
the burner base (C).
f
BE SURE ALL BURNERS
ARE IN THE OFF POSI-
TION BEFORE WIPING
OR CLEANING THE
COOKTOP.
BURNER PLATES
f
Burner Base (C)
Indentation (E)
Notch
Igniter (D)
BURNER PLATE
The Burner Plate has a notch (B) on
the burner base, directly across
from the igniter (D). This is where
the tab (A) on the burner cap fits.
NOTE: For proper burner op-
eration be sure the tab (A) on the
underside of the burner cap fits
into the corresponding notch (B)
on the burner plate.
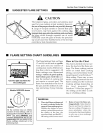
GRATES
-_-xtension
(E)
GRATE (Underside)
J
The five finger grates are porcelain
enameled cast iron or steel and have
an extension (E) that is longer (un-
derneath) than the other four. This
extension fits into the indentation (E)
on the burner plate, which is directly
across from the igniter (D).
Page 12