


Page 6
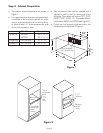
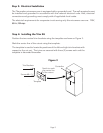
Step 5: Installing The Microwave Oven
1. Position the oven's four (4) cone-shaped legs
on the base pan's four (4) large holes. Fasten
with five (5) screws #8 x
1
/4"
.
2. Remove and retain Outer Case Screw at left
side of the oven.
Figure 4
Microwave
Oven
Outer
Case
Screw
Top
Intake
Duct
Screw #8
x
1
/4"
Rear
Intake
Duct
.
Outer Case Screw
➝
.
Side
Duct
Upper
Exhaust
Duct
3. Position Side Duct on left side of oven.
Fasten with outer case screw removed in
Step 2.
4. Position Upper Exaust Duct on top (hinge
side) of oven and fasten it together with Side
Duct by using two (2) screws #8 x
1
/4"
.
5. Remove and retain Outer Case Screw at rear
of the oven (right side).
6. Install the Grommet and the electrical cord
of the microwave in the receiving hole
provided in the Rear Intake Duct and position
this duct on rear of the oven (right side).
Fasten with Outer Case Screw.
7. Position Top Intake Duct on upper right side
of oven and fasten it together with rear in-
take duct by using four (4) screws #8 x
1
/4"
.
8. Secure all duct flanges to oven with tape
provided. Press tape to secure properly.
Grommet
Screw
8
x
1
/4"
➝
.
Note:
The four (4) ducts have a plastic cov-
ering that must be removed prior to install-
ing them onto the microwave.
WARNING
These ducts have sharp edges. Be care-
ful when handling.
Base Pan