


The Thermador Pro Hood Remote Control is designed for use in applications where the controls on the
hood are not accessible. The remote control can be installed on any vertical surface. It is most often installed in the
kitchen backsplash or just above the backsplash in the back wall. The Pro Hood Remote Control is compatible with
Pro Hood model numbers ending in 03 or higher. The model number is printed on the serial label on the back
wall of the hood.
Use and Care
Refer to “Operating the Hood” in the Pro Hood Care and Use
Manual for operating instructions.
The remote control can be wiped clean with a damp cloth.
Be careful not to use excessive water as it could damage
the controls. Refer to the Care and Use Manual included
with your Pro Hood for more detailed instructions.
Installation
Equipment Needed:
Drill and Bit
Screwdriver
Keyhole saw (or equivalent depending on installation
surface)
Rubber Mallet
Equipment Included:
Remote Control
Extension Cable
Anchors (2)
Screws (2)
Installation Instructions
Screw Covers (4)
1. Disconnect power at breaker.
2. Attach the hood in the desired location using either
the ceiling (island hoods only), wall or cabinet installa-
tion method described in the Pro Hood Installation
Instructions (included with the hood).
Before installing duct covers and integral blower or
connecting wiring, install the remote control as
described below.
3. Prepare Hood for Installation.
WALL OR CABINET MOUNT HOODS:
Remove 3 screws from the front edge of the light
panel and set aside. Support panel while removing.
Behind light panel, disconnect halogen lights at
plastic wire connectors and heat lamps (if applicable)
at flag connectors (one yellow and one white
for each lamp).
Set light panel aside.
CEILING MOUNT ISLAND HOODS:
Remove 1 screw from channel run cover. Set panel
and screw aside.
Remove 5 screws from front filter tray. Set tray and
screws aside.
Remove 3 screws from control panel cover. Set panel
and screws aside.
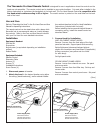
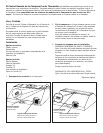
Power Supply Box;
Disconnect Control
Harness and Connect
Remote Harness Here
Remote Connection;
Connect Extension Cable
Here
Figure 1: Pro Hood with Light Panel Removed
Figure 2: Pro Island Hood with Panels Removed
(Over)
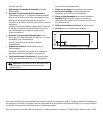
Power Supply Box;
Disconnect Control
Harness and Connect
Remote Harness Here
Remote Connection;
Connect Extension Cable
Here