


We reserve the right to change specifications or design without notice. Some models are certified for use in Canada.
Thermador is not responsible for products which are transported from the U.S. for use in Canada. Check with your local
Canadian distributor or dealer.
For the most up to date critical dimensions by fax, use your fax handset and call 775-833-3600. Use code # 8030.
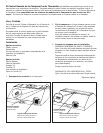
Caution: Take care not to contact electrical
wires or damage other objects behind wall.
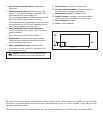
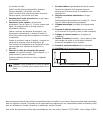
Figure 3: Remote Control Installation Cut-out Dimensions
3/16” dia.
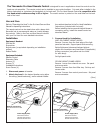
4. Disconnect control harness from black power
supply box.
5. Connect remote harness to power supply (See
Figure 1). The remote harness is attached to the
hood near the black power supply box.
Reconnect halogen lights and heat lamps and reinstall
light panel (wall or cabinet mount hood only).
Install integral blower (if applicable) and connect hood
wiring as described in Pro Hood Installation Instruc-
tions (wall or cabinet mount hood only).
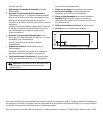
6. Connect remote control extension cable to
remote connection. See figures 1 and 2 (previous
page) for location.
Remove duct covers if previously installed.
7. Route cable to desired remote control location.
Complete Hood Installation as described in the Pro
Hood Installation Instructions.
8. Make installation cut-out in desired location.
Drill starter holes for screws (2). See Figure 3 for
appropriate dimensions.
9. Place anchors (provided) in starter holes.
10. Connect extension cable to remote control at 10
pin connector (if not already connected)
11. Place remote control in installation hole.
12. Install 2 screws (provided). Use rubber mallet to
install screw covers (provided) over screw heads.
13. Turn on power at breaker.
14. Test for proper operation.
1 3/8”
11 1/4”
3 3/8”
1/2”