


www.foodsaver.com 1-877-777-8042 www.foodsaver.com 1-877-777-8042
11 12
Recipes
for your FoodSaver
®
Appliance
Main Street Meatloaf
This meatloaf is a fantastic All-American version of classic meatloaf! Any leftovers can be packaged
in a FoodSaver
®
Vacuum Storage Bag and frozen.
3 Tbsp. unsalted butter
¾ cup yellow onion, chopped
¾ cup celery, with leaves, chopped
½ cup carrots, peeled and finely chopped
¼ cup fresh parsley, chopped
4 cloves garlic, minced
2 eggs, lightly beaten
½ cup light cream
½ cup ketchup
½ tsp. ground nutmeg
½ tsp. dried thyme
½ tsp. dried marjoram
¼ tsp. salt
1 tsp. black pepper, freshly ground
2 lbs. lean ground beef
½ lb. ground veal
½ lb. ground pork
¾ cup plain bread crumbs
1 Tbsp. Worcestershire sauce
½ cup tomato sauce
3 thick slices bacon, uncooked
canola oil nonstick cooking spray
Preheat the oven to 375° F. Coat a large rectangular baking dish with cooking spray. In a heavy skillet over
medium heat, melt the butter and sauté the onion, celery, carrots, parsley and garlic until softened and
the moisture has evaporated, about 10 minutes. Remove from the heat and set aside to cool. In a large
bowl, whisk together the eggs, cream, ketchup, nutmeg, thyme, marjoram, salt and pepper. To the egg
mixture, add the meats, bread crumbs and cooled vegetables, mixing thoroughly with a wooden spoon or
your hands. Form the mixture into a large oval and place in the baking dish. Mix the Worcestershire sauce
into the tomato sauce and spoon over the top of the meatloaf. Place the bacon slices lengthwise over the
tomato sauce. Place the pan on the middle rack in the oven and bake for 45 minutes.
Remove from the oven, loosely cover and allow to rest for 15 minutes before slicing. Serve immediately
or seal and freeze as needed.
Serves 8 or makes 2 meals of 4 servings each.
For additional delicious recipes using the
FoodSaver
®
system to prepare foods in advance,
check our website, www.foodsaver.com.
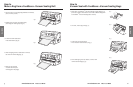
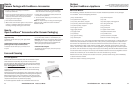
1. Prepare container according to FoodSaver
®
Accessory Guidelines .
2. Insert one end of Accessory Hose into Accessory
Port on appliance. Insert other end into port on
accessory. Twist tab on Accessory Hose while
inserting to ensure a tight fit.
3. Press Vacuum & Seal Button.
4. When motor and Indicator Light turn off, vacuum
process is complete. Note that the appliance
will still go through sealing cycle even when
vacuuming an accessory. You will hear Motor
shut off and then the sealing cycle will begin.
5. Gently twist and remove Accessory Hose from
accessory and appliance.
6. To test vacuum, simply tug on accessory lid. It
should not move.
Note: For important tips on using accessories with
different foods, please refer to the FoodSaver
®
Reference Guide.
How to
Vacuum Package with FoodSaver
®
Accessories
FoodSaver Vacuum Packaging Canisters (without
large knob on lid)
To release vacuum and open, push gray rubber
button on lid.
FoodSaver Bulk Canisters and Quick Marinators
(with large knob on lid) and Universal Lids.
To release vacuum and open, turn knob on lid
to open.
FoodSaver Jar Sealer with Mason Jars
For use with Ball
®
and Kerr
®
brand Mason jars.
Important: Do NOT use screw bands when vacuum
packaging jars. To open, wedge spoon between
Mason jar lid and highest part of threaded rim.
Twist spoon gently to release vacuum.
FoodSaver Bottle Stoppers
To release vacuum and open, twist and pull up
on Bottle Stopper.
How to
Open FoodSaver
®
Accessories after Vacuum Packaging
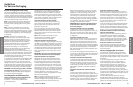
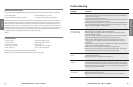
To Clean Appliance:
Remove Power Cord from electrical outlet. Do not immerse in liquid.
Check Gaskets and around Drip Tray to make sure they are free
from food materials. Wipe off gasket with warm soapy cloth if needed.
Bottom gasket may be removed for cleaning. Clean with warm, soapy
water. The top gasket is not removable.
The Removable Drip Tray makes cleanup easy when small amounts
of liquids are inadvertently pulled into the Vacuum Channel during
vacuum process.
Empty Drip Tray after each use. Wash in warm soapy water or place in top
rack of dishwasher. Dry thoroughly before re-inserting into the appliance.
Always leave lid latch in open or store position, never leave in closed
position. When appliance is left in closed position, the gaskets become
compressed and the unit may not function properly.
Do not leave appliance outside in the environment while not in use.
Care and Cleaning
Remove All Food
Around Gaskets
Lift Drip Tray Out