


www.foodsaver.com 1-877-777-8042 www.foodsaver.com 1-877-777-8042
11 12
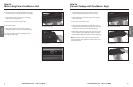
1. Prepare container according to FoodSaver
®
Accessory Guidelines.
2. Insert one end of Accessory Hose into Accessory
Port on appliance. Insert other end into port on
accessory. Twist tab on Accessory Hose while
inserting to ensure a tight fit.
3. Close lid, rotate Latch, press Vacuum & Seal
Button.
4. When motor and Indicator Light turn off, vacuum
process is complete. Note that the appliance
will still go through sealing cycle even when
vacuuming an accessory. You will hear Motor
shut off and then the sealing cycle will begin.
5. Gently twist and remove Accessory Hose from
accessory and appliance.
6. To test vacuum, simply tug on accessory lid. It
should not move.
Note: For important tips on using accessories with
different foods, please refer to the FoodSaver
®
Reference Guide.
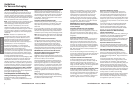
How to
Vacuum Package with FoodSaver
®
Accessories
FoodSaver Vacuum Packaging Canisters (without
large knob on lid)
To release vacuum and open, push gray rubber
button on lid.
FoodSaver Bulk Canisters and Quick Marinators
(with large knob on lid) and Universal Lids.
To release vacuum and open, turn knob on lid to
Open.
FoodSaver Jar Sealer with Mason Jars
For use with Ball
®
and Kerr
®
brand Mason jars.
Important: Do NOT use screw bands when vacuum
packaging jars. To open, wedge spoon between
Mason jar lid and highest part of threaded rim.
Twist spoon gently to release vacuum.
FoodSaver Bottle Stoppers
To release vacuum and open, twist and pull up
on Bottle Stopper.
How to
Open FoodSaver
®
Accessories after Vacuum Packaging
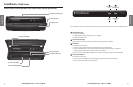
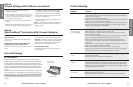
To Clean Appliance:
Remove Power Cord from electrical outlet. Do not immerse in liquid.
Check Gaskets and around Drip Tray to make sure they are free from food
materials. Wipe off Gasket with warm soapy cloth if needed. Upper and
Lower Gaskets may be removed for cleaning. Clean with warm, soapy water.
The Removable Drip Tray makes cleanup easy when small amounts of
liquids are inadvertently pulled into the Vacuum Channel during vacuum
process.
Empty Drip Tray after each use. Wash in warm soapy water or place in top
rack of dishwasher. Dry thoroughly before re-inserting into the appliance.
Always leave lid latch in open position. Never store lid in latched position
as gaskets may become compressed. When appliance is left in closed
position, the Gaskets become compressed and the unit may not function
properly.
Care and Cleaning
Remove All Food
Around Gaskets
Lift Drip Tray Out
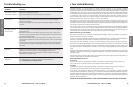
Problem
Solution
Red Seal LED Flashing • Unit is overheated. Always allow 20 seconds between seals. Under heavy
usage, appliance will shut off automatically and Red Light will flash. Wait for
20 min. for unit to cool off.
• Always wait 20 seconds between seals.
• Latch has been left closed position: Gaskets may be compressed. Unlatch and
allow 10 to 20 minutes for Gaskets to expand.
• Vacuum pump running more than 120 seconds. Under heavy usage, appliance
will shut off automatically and Red Light will flash. See next section Vacuum
Pump is running, but bag is not evacuating.
Vacuum Pump is
running, but bag
is not evacuating
• If making a bag from a roll, make sure one end of bag is sealed. See How to
Make a Bag from a FoodSaver
®
Vacuum Sealing Roll.
• Adjust the bag and try again. Make sure the open end of the bag in down
inside the vacuum channel.
• Check for wrinkles in bag along Sealing Strip. To prevent wrinkles in the seal,
gently stretch bag flat while inserting bag into Vacuum Channel.
• Open unit and make sure Gaskets are inserted properly and there are no
foreign objects, dirt or debris on the Upper or Lower Gasket (See Care and
Cleaning).
• Latch has been left closed position: Gaskets may be compressed. Unlatch and
allow 10 to 20 minutes for Gaskets to expand.
• Make sure the accessory hose is not attached to accessory port.
• Make sure the lid is latched down all the way. If the Latch does not catch the
lid and bring it down, there will be a leak between the Gaskets.
Gasket is loose or has
a tear
• Take out the gasket, clean it and reinsert the Gasket into the Vacuum Channel
(See Care and Cleaning).
• Call 877-777-8042 or visit website for replacement.
Bag is not sealing
properly
• Too much liquid in bag, freeze before vacuuming.
• Check for food debris around seal area. If present, Take out the gasket, clean
it and reinsert the Gasket into the Vacuum Channel (See Care and Cleaning).
• Bag has wrinkles: To prevent wrinkles in the seal, gently stretch bag flat while
inserting bag into Vacuum Channel.
No lights on the
control panel
• Make sure unit is plugged in.
• Make sure wall outlet is functional.
• Make sure lid is all the way down, and the Latch is in the locked position.
Trouble-Shooting