


LIGHTED ELECTRONIC DIODE
Your toaster is equipped with a lighted electronic diode (LED).This is the electron-
ic indicator light next to the toast color selector button to let you know what color
has been chosen.
In addition, the LED will allow you to see the stage of toasting during the toast
cycle. For example, select toast color 4 and press down the toast lever. The LED
indicator for color 4 will be on and the LED for color 1 will begin to flash as soon as
the toast lever is pushed down.The LED indicator advances to the next position as
toasting progresses until the selected color, which in this case is 4, is reached.This
enables you to see at a glance the current degree of toasting.
AUTOMATIC LAST SETTING MEMORY
This feature enables your toaster to hold the same setting in memory from one use
to the next as long as the toaster remains plugged in.
Approximately 5 minutes after you have finished toasting, the LED indicator light
will go out. However, as long as the toaster remains plugged in, the automatic last
setting memory will retain the toast setting previously selected. To recall previous-
ly selected color, push the toast color selector button.The LED indicator will come
on next to the last color chosen.
BEFORE USING YOUR TOASTER
Fill out warranty information.
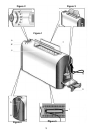
The Toastmaster Electronic Porsche Toaster features a light (1) to dark (6) color
selector with a wide range of settings in between for your personal preference.
We suggest that you try your favorite bread with the selector in the center position
(3-4). If the toast color is too light, move the color selector to a higher setting by
pressing the “+” side of toast color selector button. If too d a rk, push the color selec-
tor to a lower setting by pressing the “ – ” side of the toast color selector button, (see
figure 2.) The light setting produces a toasted piece of bread with a crisp ex t e rior and
little to no brow n i n g . A dark setting produces a darker ex t e rior and dry interi o r. W i t h
ex p e rimentation you will be able to choose suitable colors for all toasted products.
TOASTING INSTRUCTIONS
1. Plug cord into 120 V ~ 50-60 Hz outlet.The LED indicator lights for medium color
settings (3-4) will be on.
2. Adjust toast color by pressing toast color selector button, light (1) to dark (6).
3. Insert bread into adjustable toasting slot. If toasting a single item, center in slot.
NOTE: Remember, when using different varieties of toaster foods, it may be nec-
essary to change the toast color selector to achieve the desired color.
4. Push toasting lever down, the racks automatically adjust to the thickness of the
bread. The toast lever handle will return to original position. The LED indicator
by the 1 will continue flashing and advance to the next light until the desired
color is reached.
5. When the bread is toasted to the color chosen, it will pop up and the toaster
will shut off automatically. The LED indicator will stop flashing.
NOTE: To stop toasting in mid cycle, press the stop button on the side of the
toaster, (see figure 4.) The adjustable bread slots will release the food and lift it
up.You may then remove your toaster food.
4