


5
6. When finished, unplug and allow to cool thoroughly before cleaning and storing.
FRESH PASTRY
Set toast color to a light setting. It may be necessary to change the position to
compensate for thick foods or those which contain fillings.
FROZEN PASTRY
Set the toast color toward the medium color setting. Due to variation in shape and
thickness, different food items will require different settings.
HINTS FOR TOASTING
• When you select toast color 1, the LED indicator will flash continually until the
toast is done. Then the LED indicator will stay on.
• If 2 slices of bread are toasted and then followed by 1 slice of bread, it is impor-
tant that the toast color be changed by pressing the “–” side of the button 3 times
or 1
1
⁄2 toast colors.
• Thin bread will not be centered in the toasting slot and should be toasted on a
lighter color setting in order to avoid over browning.
• Thawing frozen foods before toasting will help ensure the inside of the food is
adequately warmed and prevent the outside from burning.To accommodate indi-
vidual tastes, it may be helpful to experiment.
INTEGRATED WARMING RACK
In Europe, a warming rack is designed to crisp buns which have become limp.You
may also use the warming rack to warm buns, rolls, and croissants that are too
large to fit inside the toaster slot. For faster warming or to prevent over browning,
cut the food in half.
NOTE: Foods being warmed or crispened should not completely cover the toaster
top, allow space for adequate air flow.
NOTE: Do not place food containers such as plates or foil pans on top of warmer.
1. Plug into a 120 V ~ 50-60 Hz outlet.
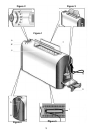
2. Lift the warming rack handle, (see figure 3.)
3. Center the foods on the warming racks.
4. Set the toast color selector to 4-5 for crisping or lower for warming.
5. Press down the toast lever. The LED indicator by the toast color chosen will
come on and the LED indicator beside the 1 will flash and advance to the next
light until the desired setting is reached.
6. When cycle is complete the LED indicator will stop flashing. Turn the food over
and repeat instruction 5.
7. Carefully remove the crisp/warm foods.
8. Retract warming rack by pressing warming rack handle down when finished and
during regular toasting.
9. When finished, unplug and allow to cool thoroughly before cleaning and storing.
CLEANING INSTRUCTIONS
1. Unplug toaster from outlet and allow to cool thoroughly.
2. Wipe outside with soft, damp cloth. Polish with soft, dry cloth.
3. Remove crumb tray from toaster by pulling out on handle, (see figure 1.)
4. Brush out crumbs.
5. Replace crumb tray.