


BEFORE USING YOUR COFFEEMAKER
Fill out warranty information.
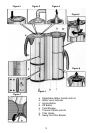
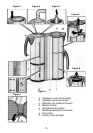
Make sure all parts to the coffeemaker are securely in place according to the
diagrams and instructions before using, (See figure 1.)
Caution: Unplug from outlet.
Clean the water carafe, water carafe lid, filter holder, thermal carafe, and thermal
carafe lid. See CARE AND CLEANING.
Thoroughly clean the coffeemaker before using. Fill water carafe with maximum
amount of water, do not add coffee grounds, then turn on coff e e m a k e r. See
BREWING. Wait until coffeemaker automatically cycles off and discard water. Wa i t
5 minutes to allow heating elements to cool. Repeat this process two more times.
Replace disassembled parts.
C a u t i o n : Do not immerse cord, plug or any part of coffeemaker (except filter
h o l d e r ) unit in water or other liquid.
NOTE: The coffee will overflow if the filter basket, thermal carafe and lid are not
securely in place.
IMPORTANT: Never place the carafe on a hot stove or in a microwave. Never put
your hand into the thermal glass carafe.
PARTS AND FEATURES
Water Carafe and Lid (a): The lid is completely removable when in the open
p o s i t i o n . Simply lift straight up and out of grooves, (See figure 4.)
The metal sleeve may not be removed like the thermal carafe sleeve.
Water Level Indicator (b): Fill water carafe with cold water using the cup markings
on the water level indicator.
Lighted Electronic Diode-LED (c): Your coffeemaker is equipped with a lighted
electronic diode. The electronic indicator light is next to the red ON aroma switch
button to let you know when the unit is in operation and what brewing quantity is
chosen.
Aroma Button (c): To ensure optimum flavor, the aroma switch regulates the
b r e w i n g process based upon the amount of coffee being prepared. When
p r e p a r i n g four cups or less, press the bottom of the red ON aroma button (2-4
cups). This will slow down the flow of water into the filter basket to provide a rich
coffee flavor by promoting a better saturation of grounds for smaller quantities.
When preparing five or more cups, press the top of the red ON aroma button (5-8
cups). This will prepare a full pot of coffee at the normal rate, allowing ample time
for the grounds to be saturated, without imparting a bitter taste. The coffeemaker
will automatically shut off when the brewing is finished, the LED light will turn off.
Off Button (d): The blue OFF button may be pressed any time during the cycle to
stop the brewing process.
Cord Storage (e): Unplug from outlet and allow to cool completely. Remove water
and thermal carafes. Rest the unit on its back so that you are looking at the under-
side. Push the cord in the opening for convenient storage. Replace coffeemaker
parts for storage. For easier cord replacement, take out only the amount of cord
necessary to reach outlet, (See figure 7.)
4