


4
OPERATING INSTRUCTIONS
CAUTION: Do not immerse Warming Tray, Cord or Plug into water
or any other liquid.
IMPORTANT: Please treat the glass surface of this tray as you would
any fine glass table top. Glass will scratch if not handled carefully. To
prevent scratching, do not slide serving pieces on the glass. Care should
be taken when using serving pieces or dishes that have a rough bottom.
This is particularly true of ceramic ware. DO NOT use the glass as a
cutting surface.
1. Before using for the first time: Carefully wipe the Warming Plate
surface with a dampened cloth and mild detergent. Wipe dry with a
soft cloth.
2. Place the tray on a flat, hard surface—like a countertop, buffet or
table—at least 2 inches away from the wall and other surfaces. DO
NOT place on an unsteady or cloth-covered surface. Air must cir-
culate freely under the Warming Plate.
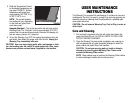
3. Insert the Detachable Power
Cord into the Power Cord
Socket (see FIGURE 1); then
plug into a 120V electrical out-
let. The Warming Tray will
start heating up as soon as
the unit is plugged in.
4. Put the foods to be warmed
into a warming/serving dish
before placing onto the
Warming Tray. DO NOT place
food directly onto the glass
Warming Plate surface.
NOTE: Silver, china, pottery, ovenware, glass, and metal serving
pieces are all appropriate. However, a flat-bottom dish will transfer
the heat from the tray to the food more readily. DO NOT use plastic
dishware!
NOTE: To keep foods from drying out, cover with aluminum foil until
serving time. Be sure the foil cover does not drape over the sides
and onto the Warming Tray.
FIGURE 1
3
3
4
1
2
5
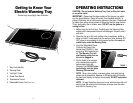
1. Stay-Cool Handles
2. Warming Plate
3. “Hot Spot” Circle
4. Power Cord Socket
5. Temperature Control
6. Detachable Power Cord (P/N 1-1424)
Getting to Know Your
Electric Warming Tray
Product may vary slightly from illustration.
6