


Préparation du café - Programmation de la minut-
erie à retardement
1. Suivre les étapes 1 à 8 de « Préparation du café–Démarrage immédiat ».
2. Vérifier que l’heure est bien exacte (voir les instructions « Régler l’heure »
à la page 7).
3. Appuyer sur le bouton PROG une fois et relâcher. Le voyant lumineux
clignotera et l’heure indiquée sera 12 h.
4. Régler l’heure de départ en utilisant les boutons HOUR et MIN, comme
décrit précédemment dans la section « Régler l’heure ».
5. Pendant le réglage, AM et PM sur l’écran changeront automatiquement.
6. Appuyer de nouveau sur le bouton PROG pour compléter le réglage de
l’heure de départ.
7. Après le réglage, appuyer sur le bouton AUTO ON/OFF une fois pour
activer la fonction Programmation. Le voyant lumineux clignotera pour
indiquer que la minuterie est réglée.
NOTA: Lorsque vous utilisez le mode de départ immédiat après avoir
effectué un cycle programmé, sans débrancher la cafetière, il peut être
nécessaire d’appuyer sur le bouton AUTO ON/OFF deux fois. La première
fois, le voyant lumineux clignotera; la deuxième fois, le voyant s’allumera
en permanence et la préparation commencera.
8. Si vous désirez servir une tasse de café durant le cycle de préparation,
retirez simplement la carafe de la plaque chauffante. L’égouttement
cessera automatiquement. Remettez la carafe à sa place sur la plaque
chauffante dans les 30 secondes qui suivent; l’égouttement reprendra. Si
la carafe n’est pas remise sur la plaque chauffante, le café pourrait débor-
der du porte-filtre.
9. Lorsque la préparation est terminée, la cafetière change de mode afin de
garder le liquide chaud; elle gardera le café à la température requise pour
le servir. Pour garder le café chaud, replacer la carafe sur la plaque chauf-
fante lorsque vous ne servez pas.
10. Appuyer sur le bouton AUTO ON/OFF une autre fois pour éteindre l’ap-
pareil lorsque vous ne vous en servez pas. Lorsque le cycle de prépara-
tion est terminé, l’appareil s’éteindra automatiquement après deux heures.
L’indicateur lumineux s’éteindra.
11. Laisser la cafetière refroidir pendant 10 minutes entre les cycles.
ATTENTION: La plaque chauffante est chaude! Ne pas toucher le bas de
la carafe ni la plaque chauffante pendant la préparation ni après celle-ci.
10
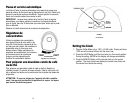
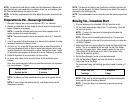
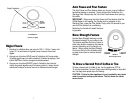
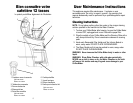
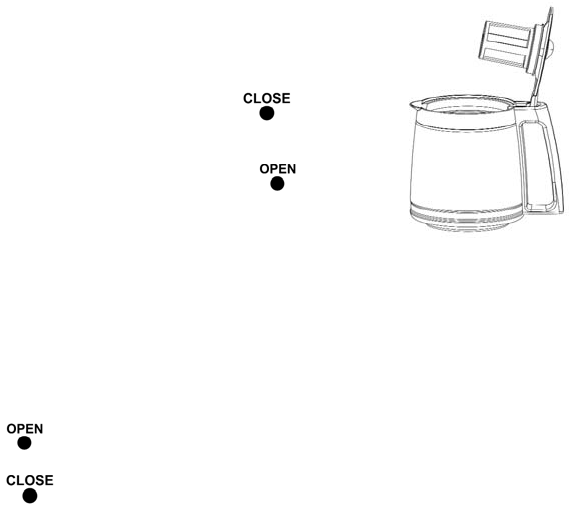
7. To remove the Tea Infusion Basket, prop the
Carafe Lid open with one hand and with the
other hold the rim of the Tea Infusion Basket.
The tab on the outer rim of the Tea Infusion
Basket will be aligned with the position
located on the bottom side of the Carafe Lid.
Turn the Tea Infusion Basket counter-clock-
wise until the tab aligns with the posi-
tion located on the bottom of the Carafe Lid.
Remove the Tea Infusion Basket and close
the Carafe Lid.
8. Place tea bags or loose leaf tea into the Tea
Infusion Basket. Be sure that no bags are outside of the basket
opening and if using tea bags, all strings have been removed.
9. Assembly of the Tea Infusion Basket to the Carafe is basically the
reverse of Step 7. Place the Tea Infusion Basket on the bottom side
of the Carafe Lid aligning the tab on the outer rim of the Basket with
the position, located on the bottom of the Carafe Lid. Hold the
Tea Infusion Basket and turn clockwise until the tab aligns with
the position and locks into place. Close the Carafe Lid.
10. Place the Carafe onto the Warming Plate. Make sure the Carafe is
positioned correctly on the Warming Plate under the Auto Pause and
Pour Assembly.
11. Press the AUTO ON/OFF Button once. The Indicator Light will turn
on and the brew cycle will begin.
12. If you wish to serve a cup of tea before the brew cycle is
complete, simply remove Carafe from Warming Plate. Dripping will
automatically cease. Return Carafe to position on Warming Plate
within 30 seconds; dripping will resume. If the Carafe is not returned
to the Warming Plate, the hot water may overflow from the Filter
Holder.
13. When brewing is completed, the appliance switches to a Keep Warm
mode which will hold tea at the proper serving temperature. To keep
the tea hot, place the Carafe back on the Warming Plate when not
serving.
NOTE: Depending on individual taste preferences and the type of
tea being brewed, you may prefer to let the tea steep longer before
removing the Tea Infusion Basket.
CAUTION: Carafe, Lid, and Tea Infusion Basket are hot after
brewing! Use extreme care when handling these parts.
11
FIGURE 2:
Tea Infusion Basket Assembly