


10. Si vous désirez servir une tasse de café avant que le cycle de pré-
paration ne soit terminé, retirer simplement la carafe de la plaque
chauffante. L’égouttement cessera automatiquement. Remettre la
carafe en place sur la plaque chauffante dans les 30 secondes; l’é-
gouttement reprendra. Si la carafe n’est pas replacée sur la plaque
chauffante, l’eau chaude pourrait déborder du porte-filtre.
11. Lorsque la préparation est terminée, la cafetière change de mode
afin de garder le liquide chaud; elle gardera le café à la température
requise pour le servir. Pour garder le café chaud, replacer la carafe
sur la plaque chauffante lorsque vous ne servez pas.
12. Appuyer sur le bouton AUTO ON/OFF une autre fois pour éteindre
l’appareil lorsque vous ne vous en servez pas. Lorsque le cycle de
préparation est terminé, l’appareil s’éteindra automatiquement après
deux heures. L’indicateur lumineux s’éteindra.
13. Laisser la cafetière refroidir pendant 10 minutes entre les cycles.
ATTENTION: La plaque chauffante est chaude! Ne pas toucher le
bas de la carafe ni la plaque chauffante pendant la préparation ni
après celle-ci.
NOTA: La quantité de café dans la carafe peut être légèrement
inférieure à la quantité d’eau qui a été versée dans le réservoir d’eau, car
une certaine quantité d’eau est absorbée par les grains de café.
9
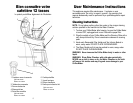
14. Press the AUTO ON/OFF Button again to turn the unit OFF when
not in use. When the brewing cycle is over, the appliance will
automatically shut off after two hours. The Indicator Light will turn off.
15. Allow the unit to cool for 10 minutes between cycles.
WARNING: Warming Plate is hot! Do not touch bottom of Carafe or
Warming Plate during or after brewing.
NOTE: The amount of tea in the Carafe may be slightly less than the
amount of water placed in the Water Chamber, since some of the water is
absorbed by the loose leaf tea or tea bags.
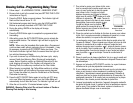
Brewing Tea - Programming Delay Timer
1. Follow steps 1 – 10 in BREWING TEA – IMMEDIATE START.
2. Be sure clock is set to the current time (see SETTING THE CLOCK
instructions on Page 6).
3. Press the PROG Button once and release. The Indicator Light will
flash and the time will show 12 : 00.
4. Set the desired program start time by using the HOUR and MIN
Buttons as previously described in SETTING THE CLOCK.
5. During the setting, AM/PM on the display will change automatically.
6. Press the PROG Button again to complete the programmed start
time setting.
7. After setting, press the AUTO ON/OFF Button once to activate the
programmable function. The Indicator Light will flash to signify the
timer is set.
NOTE: When using the Immediate Start mode after a Programmed
cycle has been used, without unplugging the unit in-between, it may
be necessary to press the AUTO ON/OFF Button two times. The
first time the Indicator Light will flash; the second time the Light will
turn solid and brewing will begin.
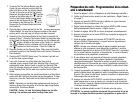
8. If you wish to serve a cup of tea before the brew cycle is complete,
simply remove Carafe from Warming Plate. Dripping will automatical-
ly cease. Return Carafe to position on Warming Plate within 30 sec-
onds; dripping will resume. If the Carafe is not returned to the
Warming Plate, the hot water may overflow from the Filter Holder.
9. When brewing is completed, the appliance switches to a Keep Warm
mode which will hold the tea at the proper serving temperature. To
keep the tea hot, place the Carafe back on the Warming Plate when
not serving.
12