


4
1. Wash the inside of the percolator and basket assembly thor-
oughly before using for the first time. Do not wash power base.
See CLEANING INSTRUCTIONS.
2. Place power base on a level countertop. The base must be dry
before placing percolator on base. Make sure switch is posi-
tioned to left (off position).
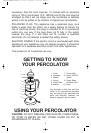
3. Remove Cover, Basket, Spreader and Pump Tube. Use cold,
fresh tap water to fill Percolator. The automatic brewing cycle is
timed to begin with a cold water start. Fill according to markings
on inside of Percolator for number of cups desired.
NOTE: The bottom of the Pump Tube Spring marks the maxi-
mum capacity of the Percolator.
4. Wet Coffee Basket to help keep small particles of coffee from
sifting through. Place Basket on Pump Tube. Add desired
amount of coffee to Basket.
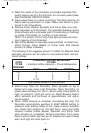
The following chart suggests amount of coffee for different brew
strengths; amounts can be varied to suit personal taste and par-
ticular coffees.
STANDARD COFFEE MEASURES
CUPS TO USE
TO BE 1 standard coffee measure = 2 level tablespoons
BREWED
MILD MEDIUM STRONG
10 579
8 468
6 346
4 2-1/4 3 4
1 cup brewed coffee = 5 fluid ounces
5. Place Pump Tube into Percolator. Place spreader on top of
basket and snap cover onto Percolator. Place Percolator on
power base and plug into 120 V ~60 Hz outlet. Place switch to
right (on position). Light will come on. Rapid Brewing begins
within seconds and continues at approximately one cup-a-
minute speed.
6. When coffee brewing is complete, percolating will stop. The
Percolator automatically switches to KEEP WARM setting to
preserve fresh-tasting coffee at hot, ready-to-serve tempera-
ture. Power light remains on. For best flavor, using oven mitts
carefully remove Coffee Basket, Spreader and Pump Tube
when brewing is completed. Remove Percolator from power
base to serve coffee, light will go off. Replace on base to keep
warm and light will come back on.
MEP10C&MEP10CCAN_6-12-04 12/6/04 1:47 PM Page 4