


40
Recettes
RAGOUT DU PETIT DEJEUNER
1 c. à soupe d’estragon haché
226 g de saucisses cuites
3 tranches de pain en dés
3/4 de verre de substitut d’œuf
3/4 de verre de cheddar râpé
1 verre de lait
1/4 de c. à café de sel
1 c. à café de moutarde
1/8 de c. à café de piment de Cayenne
Préchauffer le four sur le mode de cuisson conventionnelle
‘BAKE’, sur 218°C. Placer la saucisse, l’estragon et le pain en dés
dans un moule huilé de 20 cm x 20 cm. Battre les oeufs, le
fromage, le lait, le sel, la moutarde et le poivre ensemble. Verser
sur le mélange de pain. Faire cuire pendant 20 minutes où
jusqu’à ce que le plat soit cuit.
TOMATES AUX HERBES FRAICHES
8 tomates en tranches de 1 cm
2 tranches de pain en chapelure
2 c. à soupe de Parmesan râpé
1 c. à soupe d’origan frais haché
1 c. à soupe de basilique frais haché
2 gousses d’ail émincées
1/8 de c. à café de sel
1/8 de c. à café de poivre
Placer la plaque spéciale gril dans la plaque de cuisson/gril.
Disposer les tomates tranchées sur la plaque spéciale gril. Faire
griller sur ‘BROIL’ pendant 3 à 4 minutes. Mélanger les ingrédients
restants. Retourner les tomates tranchées et verser la préparation
dessus.
Faire griller 3 à 4 minutes ou jusqu’à ce qu’elles aient doré.
Pour 4 personnes
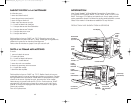
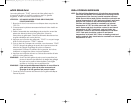
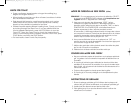
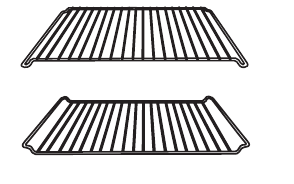
SHELF AND RACK POSITIONS
Depending on the size of your food or
the height of your baking pan, you may
wish to adjust the height and position of
the Wire Rack. There are 2 Shelf Positions
that the Wire Rack or inverted Wire Rack
fits into. Slide the Wire Rack into the
Oven making sure that it is level and properly positioned. You may
use the Wire Rack in the normal position or invert it.
• When using the BROIL Function, your food should be 1- 2 inches
from the top element.
• When baking, the shelf position used will depend on the size of
the food being prepared. It is important to place your food as
close to the center as possible to ensure even cooking.
KEEP WARM FUNCTION
Use the KEEP WARM Function at 200ºF, f or 5 minutes to a
maximum time of 1 hour. The temperature cannot be adjusted.
1. Plug the Digital Convection Oven into a 120V AC outlet.
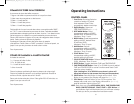
2. Press the KEEP WARM Button. The red Indicator Light next to the
KEEP WARM Button will illuminate.
3. The TIME Light will also illuminate and the default TIME 0:30
minutes will appear on the Display. To change the TIME, press
the UP or DOWN Arrow and it will change in 5 minute
increments. You may set the Oven to KEEP WARM for 5 minutes
to a maximum of 1 hour.
NOTE: If you press the SELECT Button, the TEMPERATURE Light will
illuminate and the preset temperature of 200°F will appear in
the Display. The temperature cannot be adjusted. Press the
SELECT Button again.
4. Open the Door and center food on the Wire Rack. Close
the Door.
5. Press the START Button to begin warming. The Display will show the
last selection, TIME or TEMPERATURE. If TEMPERATURE was selected
last, it will remain on the Display for approximately 30 seconds;
then it will display the TIME as it counts down. At the end of the
pre-set time, the Oven will sound 5 beeps and turn itself OFF.
6. You may turn the Oven OFF and cancel warming at any time by
pressing the red STOP Button.
7. Wear protective oven mitts to remove food from Digital
Convection Oven.
8. Unplug and allow to cool before cleaning.
HINTS FOR KEEP WARM
• Use for short periods of time after food is cooked.
7
Inverted Wire Rack
Wire Rack
RHTCOB328D,B,W_IB_Corr_11-1-05 1/11/05 8:19 PM Page 15