


9
16
Installation
Choosing a Location
Because you will be using your Microwave Oven frequently, choose a loca-
tion that allows convenient access. Keep these points in mind when decid-
ing where to place your oven:
1. The oven must be placed on a firm, level surface.
2. Air must circulate freely around the oven. Allow at least 3 inches of
clearance around all sides and 12 inches above. Do not remove the
legs from the bottom of the oven.
3. Do not install oven over a range cooktop or other heat-producing
appliance.
4. Place the oven as far away from radios and TVs as possible.
Microwave oven operation may cause reception interference.
5. The oven should be the only appliance on the circuit.
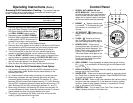
Assembling the Turntable
The Turntable Ring Assembly and Glass Turntable must always be used
when cooking.
1. Place the Turntable Ring Assembly in the center of the Microwave
Oven.
2. Place the Glass Turntable on top of the Turntable Ring Assembly, mak-
ing sure that the central indentations on the underside of the Glass
Turntable properly engage with the Turntable Drive. The Turntable must
turn freely when oven is in use. If not, make sure the Glass Turntable
and Turntable Ring Assembly are properly positioned.
NOTE: The Turntable may reverse direction when the oven is stopped
and restarted. This is normal operation.
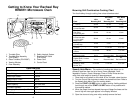
Setting the Clock
Plug the cord into a 120V AC electrical outlet. The Display Window will
show 0:00.
1. Press the CLOCK button once. The hour digits will flash and the clock
icon will illuminate.
2. Turn the Control Dial to select the proper hour; 0 through 12.
3. Press the CLOCK button again. The hour digit(s) will stop flashing and
the minute digits will begin to flash.
4. Turn the Control Dial to select the proper minutes; 0 through 59.
5. Press the CLOCK once again. The colon (:) between the hour and
minutes will begin flashing, indicating that the clock has been set. The
minute digits will stop flashing and the clock icon will go out.
NOTE: If, during the clock setting process the PAUSE/STOP button is
pressed or there is no operation within 3 minutes, the time indication will
return to the previous status.
Operating Instructions (Cont.)
Defrost by Weight
1. Place the food to be defrosted on the center of the Turntable, close
the door and press the JET DEFROST button once to select dEF1.
2. Turn the Control Dial to select the specific weight, in 1/4 pound incre-
ments, up to a maximum of 4 pounds.
3. Press the START/+30 SEC button to start defrosting.
4. When the preset time has elapsed the oven will beep five times and
the time of day will once again appear in the Display Window.
Defrost by Time
1. Place the food to be defrosted on the center of the Turntable, close
the door and press the JET DEFROST button twice to select dEF2.
2. Turn the Control Dial to select the specific defrost time up to a maxi-
mum of 95 minutes.
3. Press the START/+30 SEC button to start defrosting.
4. When time has elapsed the oven will beep five times and the time of
day will once again appear in the Display Window. Allow to sit in the
microwave oven for five minutes to finish thawing.
NOTE: Turn food over once or twice during defrost time, break up into
smaller pieces. Remove thawed food and continue to defrost frozen
portion.
Basic Cooking - This method allows you to choose a specific power
level and time before starting the oven.
1. Place the food to be cooked on the center of the Turntable, close the
door and press the POWER LEVEL button. The default power level
P100 (100%) will appear in the Display Window.
2. Turn the Control Dial until your desired power level appears. Power lev-
els change in increments of 10%, displaying P90, P80, P70 etc. to a
minimum of P10 (10%).
3. Press the POWER LEVEL button once again to confirm your selec-
tion.
4. To set the time, turn the Control Dial until your desired cooking time
appears in the Display Window, up to a maximum of 95 minutes.
5. Press the START/+30 SEC button to start cooking.
6. When time has elapsed the oven will beep five times and the time of
day will once again appear in the Display Window.
7. Open the door and using oven mitts, carefully remove the food.