


1. Carefully place the Rubber Seal Ring over the Blade Assembly.
2. Place the Blade Assembly in the Blending Jar, turning the Blade
Assembly clockwise to tighten.
NOTE: The Blade Assembly must be firmly attached to the Blending Jar
before putting any foods or liquids into the Blending Jar.
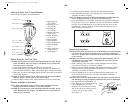
3. Place the Blending Jar with Blade Assembly into the Motor Housing by
lining up the arrow on the Blending Jar with the UNLOCK on the Motor
Housing. Turn the Blending Jar to the right so that the arrow on the
Blending Jar is lined up with the arrow in the LOCK position on the
Motor Housing. (See Figure 2.)
Operating Instructions
CAUTION: Keep hands and utensils out of the Blending Jar while blending
to prevent the possibility of severe injury to persons or damage to
the unit. A scraper may be used but must only be used when the unit
is not running.
CAUTION: Use extreme care when handling the Blade Assembly. Do not
touch Blades with your fingers. The Blades are very sharp and can
cause injury if touched.
1. Before starting, make sure power cord is unplugged and the Speed
Control Dial is turned to “0”, the OFF position.
2. Make sure that the Blade Assembly and Rubber Seal Ring are properly
assembled and securely fastened to the Blending Jar. See Blender
Assembly Instructions for details.
3. Lock the Blending Jar on top of the Motor Housing making sure it is
firmly seated and not tilting to one side. See Blender Assembly
Instructions for details.
CAUTION: Never place the Blade Assembly on the Motor Housing without
the Blending Jar being completely assembled and securely tightened.
4. Add ingredients to the Blending Jar.
5. Place Blending Jar Lid with Measuring
Cap on Blending Jar. Turn the
Blending Jar Lid so that the Locking
Tab of the Lid fits securely into the
notch in the top of the Handle.
(See Figure 3.)
UNLOCK position
LOCK position
Figure 2
Locking
Tab
Handle
Notch
Figure 3
4
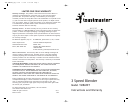
Getting to Know Your 3-Speed Blender
Product may vary slightly from illustrations.
3
Figure 1
1. Measuring Cap
(P/N 71238)
2. Blending Jar Lid
(P/N 71239)
3. Blending Jar
(P/N 71240)
4. Rubber Seal Ring
(P/N 71241)
5. Blade Assembly
(P/N 71242)
6. Motor Housing
7. Speed Display
8. Speed Control Dial
9. Non-Slip Rubber
Feet
10. Power Cord with
Polarized Plug
11. PULSE Button
Before Using for the First Time
CAUTION: Use extreme care when handling the Blade Assembly. Do not
touch the Blades with your fingers. The Blades are very sharp and
can cause injury if touched.
1. Carefully unpack the Blender, Blending Jar, and all parts.
2. Wash the Measuring Cap, Rubber Seal Ring, Blending Jar, Blending Jar
Lid, and Blade Assembly in warm soapy water. Rinse and dry thoroughly.
3. Make sure the cord is unplugged and the Speed Control Dial is turned to
“0”, the OFF position.
CAUTION: To protect against risk of electrical shock, do not place Motor
Housing, plug or cord in water or any other liquid.
4. Wipe the Motor Housing clean with a moistened cloth. Dry thoroughly.
Blender Assembly Instructions
NOTE: Before assembling, make sure the cord is unplugged and the
Speed Control Dial is turned to “0”, the OFF position.
CAUTION: Use extreme care when handling the Blade Assembly. Do not
touch Blades with your fingers. The Blades are very sharp and can
cause injury if touched.
TMR_TMBLRET_IB_6-7-06 7/7/06 6:35 PM Page 7