UV-SVN03D-EN 27
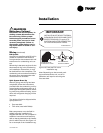
WARNING
Hazardous Service
Procedures!
The maintenance and trouble-
shooting procedures recommend-
ed in this section of the manual
could result in exposure to electri
-
cal, mechanical or other potential
safety hazards. Always refer to
the safety warnings provided
throughout this manual concern
-
ing these procedures. When possi-
ble, disconnect all electrical
power including remote discon-
nects before servicing. Follow
proper lockout/tagout procedures
to ensure the power can not be in
-
advertently energized. When nec-
essary to work with live electrical
components, have a qualified li-
censed electrician or other indi-
vidual who has been trained in
handling live electrical compo-
nents perform these tasks. Failure
to follow all of the recommended
safety warnings provided, could
result in death or serious injury.
Service Access
To access the unit for water balancing,
motor access or other start-up and
maintenance functions, use one of the
following methods:
1 Remove the end pocket front
panel.
2 Remove the return air grille by re-
leasing the mounting screws.
3 If there is no shelving or other ob-
structions, removing the end panel
may allow more access.
Periodic Maintenance
The following maintenance sugges-
tions apply to all types of unit ventila-
tors, chilled water, hot water, split
systems and electric. Additional infor-
mation for controls not supplied by
The Trane Company should be ob
-
tained from the controls manufactur-
er.
Split system unit ventilators include a
condensing unit and the instructions
provided with the condensing unit will
apply to the entire refrigerant system.
Filters
The air filters supplied with Trane UV’s
are specially designed for high lint
content. Depending upon room condi-
tions, these filters will normally need
to be replaced every 4 to 8 weeks. To
assure proper unit operation, inspect
the filters monthly and clean or re
-
place as required.
Overloaded filters will reduce unit air
handling capacity, which may result in
insufficient heating during the morn
-
ing warm-up period and loss of natural
cooling capacity during mild weather.
Filter Replacement
The air filter on the vertical unit is lo-
cated near the bottom of the unit Filter
sizing may be found on Table G1.
.
1 To remove the filters, take-off the
air section’s front panel.
2 Slide the filter out of the filter rack
on the bottom of the unit.
3 Replace old filter with new filter
and re-attach front panel.
CAUTION
Equipment Damage!
Do not operate unit without filters
or grilles in place. Failure to do so
may cause equipment failure
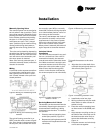
Cleaning of the Drain Pan
The unit ventilators drain pan is re-
movable for periodic cleaning or easy
access for maintenance/drainage is
-
sues. Use Figure 16, and the steps be-
low for removing the drain pan.
1 Turn off power to the unit and re-
move the front panel.
2 Disconnect the condensate drain
line from the P-trap.
3 Disconnect fan plug.
4 Remove (4) pan clips located at
each end of the pan’s front.
5 Slide out fan board.
6 Remove drain pan for cleaning.
7 When reinstalling, reverse se-
quence.
Maintenance
!
1
2
3
4
Slide out fanboard
Figure 16: Removal of drainpan


