


-4-
IV. d - BATCH LOADING:
The Even-Thaw model can accommmodate any size partial
load, or up to twenty eight (28) 18” x 26” pans of product. Use
of aluminum pans is highly recommended. Product should be
placed on pans in one layer only to allow for proper air ow.
When completely loaded with frozen product (at approxi-
mately -5°F), the interior cabinet air temperature will begin
to drop and approach the product temperature as a result.
When this occurs the heaters begin operation in order to
return the cabinet temperature back up to the heater setpoint
temperature (37°F). This portion of the thaw cycle may take
place for approximately 8 to 12 hours. With a full product load
the interior cabinet temperature should remain at or below
37°F for approximately 8 to 12 hours of the expected 18-24
hour total thaw cycle time.
IV. e - PROCESS LOADING:
If the cabinet is unloaded as needed and replaced with frozen
product, the average cabinet temperatures remain higher.
A fully loaded cabinet with the refrigeration system cycling
from 38°F to 40°F thaws product faster than one maintaining
operation at below 32°F air temperatures for several hours.
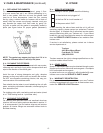
IV. f - INTERIOR ARRANGEMENTS:
Each reach-in Even-Thaw model includes 14 pairs of #1
trayslides (16 gauge stainless steel angle type) for bottom
support of either: (1) 18” x 26” pan per pair of tray slides or
(2) 14” x 18” pans per pair of tray slides, per section.
IV. g - ADJUSTING THE TEMPERATURE SCALE:
The Traulsen Even-Thaw model is preset at the factory to
operate within strict temperature parameters. Please contact
our Service Department at (800) 825-8220 for any additional
technical support.
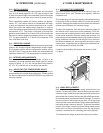
V. a - CLEANING THE CONDENSER:
The most important thing you can do to insure a long, reli-
able service life for your Traulsen is to regularly clean the
condenser coil.
The condensing unit requires regularly scheduled cleaning
to keep the nned condenser clean of lint and dust accum-
mulation. Keeping the condenser clean allows the cabinet to
operate more efciently and use less energy.
To clean the condenser, rst disconnect electrical power to
the cabinet and lift up the front louver assembly. To lift this,
remove the two screws located on both sides at the bottom
of the louver assembly. Once the screws are removed, the
panel can be pivoted upwards allowing full access to the front
facing condenser. Vacuum or brush any dirt, lint or dust from
the nned condenser coil, the compressor and other cooling
system parts. If signicant dirt is clogging the condenser ns,
use compressed air to blow this clear.
Lower louver assembly and replace the screws to hold
it in place.
V. b - HINGE REPLACEMENT:
Both the door and hinge can be easily removed from the
cabinet. To remove the door, remove the plug at the bottom
of the top hinge. Inside the hinge there is a small screw which
secures the door in place. Remove this with a at head screw-
driver and the door can then be lifted off the hinge. To remove
the door portion of the hinge from the door, lift off the hinge
cover and then remove the three Phillips head screwswhich
secure the hinge in place on the door. To remove the cabinet
portion of the hinge, remove the three Phillips head screws
which hold it in place. On solid door units, the top hinge(s)
contains a microswitch for controlling the interior lighting.
To reassemble the hinge reverse the previous procedure.
IV. OPERATION (continued) V. CARE & MAINTENANCE