


Installation & Service Manual N5D, N5DH, N5DL, N5DSC
January, 2001 Page 13
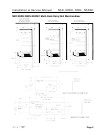
CLEANING AND SANITATION
Component Removal and Installa-
tion Instructions for Cleaning
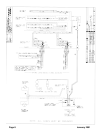
Mirrors
1. Remove mounting screws and end mold-
ing of mirror line-up.
2. Carefully grasp and lift mirror section until
bottom edge clears the lower mirror track.
3. Carefully lower mirror out of upper mirror
track and remove from case.
4. After cleaning, replace in reverse order.
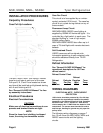
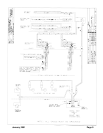
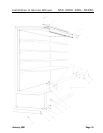
Shelves and Shelf Brackets
1. Remove product from shelves.
2. If shelf has a light, unplug the light cord
from the socket in the rear duct panel.
Completely insert socket cover in the light
socket to protect the receptacle.
3. Push shelves back and then lift up and out
to remove them from the shelf brackets.
4. Remove shelf brackets from slots in rear
uprights.
5. After cleaning, replace in reverse order.
Bottom Trays
1. Remove product from bottom of case.
2. Grasp and lift out each of the bottom trays
from the case interior.
3. After cleaning, replace in reverse order.
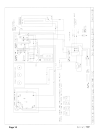
Front Air Ducts
1. Remove lower trays, see this page.
2. Lift out front air duct sections.
3. After cleaning, replace in reverse order.
Rear Duct Panels
(w/o Shelf Light Sockets)
1. Remove shelves and bottom trays, see
above.
2. Remove mounting screws and rear duct
panels from case.
3. After cleaning, replace and secure rear
duct panels in reverse order.
(with Shelf Light Sockets)
1. Remove mirrors, shelves and bottom
trays, see this page.
2. Remove mounting screws from rear duct
panel.
3. Slowly lift out rear duct panel until the
shelf harness connector near the top of
the panel can be accessed.
4. Disconnect shelf harness connector and
complete removing the rear duct panel.
WWAARRNNIINNGG
Rear duct panels with electrical recepta-
cles can be cleaned without removing the
electrical receptacles. Do not get moisture
on electrical wires when cleaning under
this cover. Moisture on wires could cause
premature product failure and/or personal
injury or death from electrical shock.
5. After cleaning, reconnect the shelf har-
ness connector: install the top socket
assembly: replace and secure rear duct
panels in reverse order.
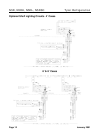
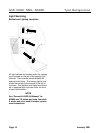
Discharge Air Honeycomb
1. Loosen screws securing rear retainer
plate.
NOTE
Note position of the honeycomb grid dur-
ing removal so it can be reinstalled the
same way.
2. Slide rear retainer plate back until the
honeycomb grid sections can be removed
from the top duct.
CAUTION
Improper installation of the honeycomb
grid section could result in improper air
flow and/or poor refrigeration.
3. After cleaning, replace honeycomb grid
sections as they were removed and
secure with the rear retainer plate and
screws.