


3-39
Section 3 - Service and Repair
turn back on. If desired, you can manually cancel this mode by
touching the LIGHT button. Release and the unit will automatically
start normal operation.
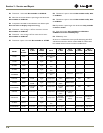
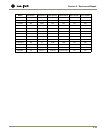
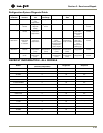
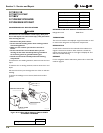
MODEL NUMBER CHANGE
Origins Model Selection:
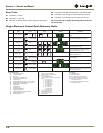
Origins Service Menu
Enter service menu by holding WARMER and pressing LIGHT
three times. Select option 1 to 16 with the WARMER and
COLDER keys. To enter the option, press the LIGHT key. If
changing a setting, you must press the LIGHT key again to retain
the changed setting.
When entering service mode all other modes are cancelled and
the unit will stop operating. When exiting service mode the unit
will begin to operate normally, however the four-minute
compressor off cycle still applies.
1. Light all LED segments
This will illuminate all the LEDs on the board to ensure they
work properly.
2. Thermistor 1 status—Temperature, E1, or E2
This will show the pure thermistor reading with no offsets
taken into account. When placed in ice water this thermistor
should read 32°F in this menu option.
3. Error log
A list of the errors in the order they occurred will scroll once
on the display. Repeat if desired. Once viewed perform option
12 to clear the errors from memory.
4. Defrost information
Displays the number of defrosts that have occurred in the past
24 hours.
5. Compressor runtime based on last cycle
This will show the number of minutes the compressor has run
in the prior cycle (or current cycle if the compressor was
running when service mode was entered).
6. Defrost length adjust min—99 minutes
The length of the defrost can be adjusted up to 99 minutes
long (for every six hours). The other defrost parameters still
apply. Lengthening a defrost may cause higher than normal
temperatures in the refrigerator section.
7. Light switch 1 status—0 or 1
This will tell if the light should turn off with the door switch or
not. At the “0” reading the light should be off with the door
closed and on with the door open. At the “1” reading the light
stays on always.
8. Display toggle status—0 or 1
This will tell if the display should turn off with the door switch
or not. At the “0” reading the light should be off with the door
closed and on with the door open. At the “1” reading the light
stays on always.
9. Restore factory defaults
This will restore the default set-point, defrost and offset values.
10. Adjust thermistor 1 offset—10 to +10F
This allows calibration of the sensor to cabinet for abnormal
operations. By adjusting this number colder you can change the
average cabinet temperature to a colder value.
11. Data download
Along with the separate USPY software you can download the
rolling data file.
12. Clear error log
Perform this operation after checking the errors.
13. Clear download memory
Clears the rolling data file if desired.
14. Model number displayed
Displays the two-digit model number of the specific unit.
15. Adjust thermistor 1 differential.
This number should not be adjusted.
16. Software number
This will show the software on the board.
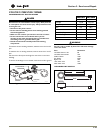
1. Make sure board is not plugged in.
2. Hold down ON/OFF key and plug in unit.
3. Release ON/OFF key.
4. Press and release LIGHT icon.
5. Use WARMER/COLDER to select the model
number desired.
49-1175R/ADA24R 120V
50-1175WC 120V
51-1175BEV 120V
52-1175R 220V
53-1175WC 220V
54-1175BEV 220V
56-1115R 120V
57-1115R 220V
77-1115WC 120V
78-1115WC 220V
6. Press and release LIGHT icon.
7. Wait for display to stop.
8. Unplug unit and wait 5 seconds.
9. Plug unit back in.