


1817
Setting the Bake Hours Program
The Bake Hours program is used for controlled timing of baked or
roasted foods. At the end of the timed cycle, the oven automatically
turns off.
Setting the Automatic Start Time Bake Program
The Bake Hours program is used for controlled timing of baked or
roasted foods. At the end of the timed cycle, the oven automatically
turns off.
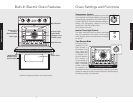
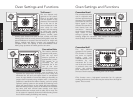
To Set The Bake Hours Program
1. Turn the “manual” knob to “upper timed” or “lower timed”
position, depending upon the oven mode and oven being used.
2. Set the Oven Function Selector to the BAKE, CONVECTION
BAKE, or TRUCONVEC™ position, depending upon the type of
baking being used.
3. Set the temperature control knob to the desired temperature and
allow for preheating.
4. Press and release the bake hours button. The timer will display
:00 with the words SET and COOK in the upper right corner of
the digital display.
5. Turn the “Set” knob until the desired baking time is displayed in
hours and minutes. The cook time/remaining time and the word
COOK will be displayed.
The word COOK will flash and the tone will sound three times when
the time is completed; oven will turn off. The tone will sound twice
every ten seconds after completion until timer function is cleared.
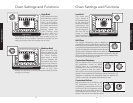
To set the Automatic Time Bake Program
1. Set the start time:
A) For Single Ovens – Program the start time by pressing the
“start time” button and turning the “Set” knob until the desired
start time is displayed. This is the time of day you want the food
to begin cooking.
B) For Double Ovens – Press the “start time” button once to set
the starting time for the upper oven (UPPER OVEN will show on
the display). Press the “start time” button twice to set the
starting time for the lower oven (LOWER OVEN will show on the
display). Then program the start time by turning the “Set” knob
until the desired start time is displayed. This is the time of day
you want the food to begin cooking.
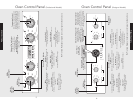
Product Controls
2. Set the desired baking time:
Once the start time is set, the display will switch to :00 and the
words SET, COOK and TIME will appear on the right side of
the display. You will now enter the desired baking time. Turn
the “Set” knob until the desired baking time is displayed in
hours and minutes. Once the desired bake time is set, the
word SET will disappear and the word DELAY will appear in
the display indicating that the Bake Hours program has been
set.
NOTE: For Double Ovens, the word DELAY will show with either
UPPER OVEN or LOWER OVEN depending on which oven has
been selected.
3. Set the Oven Function selector to the desired function –
BAKE, CONVECTION BAKE, OR TRUCONVEC™, etc.
4. Set the temperature control knob to the desired baking
temperature.
5. The automatic time bake program is now set!
NOTE: The display will continue to show the amount of bake time
that was programmed (this will remain until the programmed start
time is reached). You can return the display to clock mode by
pressing the “probe/temp” button – Notice that a small clock will
be displayed in the upper right corner to indicate that a program is
in progress. Switch back to the timer mode by pressing the “bake
hours” button.
6. When the specified time is reached, the oven will automatically
turn on. It will bake for the programmed amount of time at the
selected temperature.
NOTE: At one minute from the end of the specified bake program,
the oven timer will beep once. At the end of the specified bake
program, the oven will automatically turn off and the timer will
sound a series of three beeps. This will continue until the “start
time” button is pressed. The display will then return to displaying
the time.
NOTE: Setting the remaining duration time to :00 will cancel the
Automatic Bake program.
Product Controls
Clocks and Timers (Analog Clock) Clocks and Timers (Analog Clock)