


RIINSEAIIDS
A rinse aid causes water to flow off:the dishes quicker, preventing droplets that dry as spots and making drying
performance better. Rinse aids come in solid and liquid forms. Your dishwasher's rinse aid dispenser uses the liquid
form. For the best results, use a liquid rinse aid only if you have moderately hard to hard water. Rinse aids used with
soft water can cause a cloudy film on dishes.
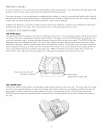
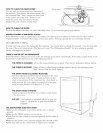
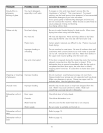
FILLING THE RINSE AID DISPENSER
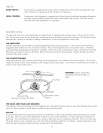
Drying will usually be better if you use a rinse aid. There is a level indicator next to the rinse aid container which shows
whether it is empty or full. If the indicator appears completely black, there is sufficient rinse aid. If the size of the black
spot is reduced, the container requires filling. To fill the dispenser, open the cap and pour the rinse aid into the
dispenser until the level indicator turns completely black. The dispenser will hold approximately four
Level indicator
ounces of liquid rinse aid.
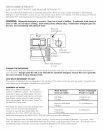
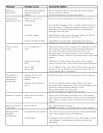
ADJUSTING THE DOSAGE OF RINSE AID
The rinse aid dosage is set by the manufacturer and
is dispensed automatically into the final rinse. If
necessary, the rinse aid dosage can be adjusted by
insertin 9 a screwdriver inside the filler hole where
the adjustment device is set on "1 ". It is
recommended that the dial is only adjusted one
number at a time. NOTE: Too much rinse aid is not
advisable as this might result in the formation of
foam, especially if the dishwasher is connected to
cold water supply.
/
'20
Prewash / Rins_
\aid
compartment dispenser
NOTE: The dishwasher has an indicator on the control panel that displays when the rinse aid dispenser is almost
empty. After refilling the dispenser, there may be a small delay before the indicator goes out.
CH]ILD SAFE ]FEATURE (DFUD142 only)
As a safety measure, the dishwasher can be programmed to prevent a child from accidentally starting the machine or
changing the program, This unit can be programmed not to start unless the Temperature and Drying buttons are held
down simultaneously, To program this feature, follow the steps below:
1. Turn off the power to the machine.
2. Simultaneously press and hold clown the Temperature and Extra Dry buttons as you turn on the power to the
machine. The Temperature, Drying and Start buttons will flash.
3. Release the buttons.
4. Press the Program button. The Pots/Pans button will glow to indicate the button lock is activated.
5. Press the Start/Stop button to store settings.
Once the child-safe feature is active, the Temperature and Drying buttons will flash whenever pressing any of the
buttons. To temporarily deactivate the button lock, simultaneously press the Temperature and Extra Dry buttons. The
lock will reactivate automatically in three minutes. To completely deactivate the button lock, repeat the steps above.
The Pots/Pans button will go out to indicate the button lock is off.
ACT]IVAT]ING THE ]END-OF4PROG]R M S]IGNAL (DFUD142 only)
This unit can be programmed to emit a short signal when the program is finished, To program this feature, follow the
steps below:
1. Turn off the power to the machine.
2. Press and hold clown the Delay Start button as you turn on the power to the machine. The Delay Start button will
flash.
3. Release the button.
4. Press the Program button. The Pots/Pans button will glow to indicate the end-of-program signal is activated.
5. Press the start/stop button to store the settings.
To deactivate the signal, repeat the steps above. The Pots/Pans button will go out to indicate the signal is off.