


Operation
25
24
Operation
Surface OperationSurface Operation
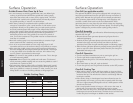
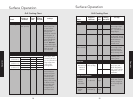
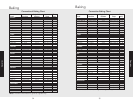
Food Temp (°F) Temp (°C)
Eggs
250-300 121-149
Bacon
300-325 149-163
Pancakes
375-400 191-205
French Toast
400 205
Fish Fillets
300 149
Hamburger
350 177
Steaks
350 177
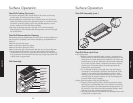
Griddle/Simmer Plate Clean Up & Care
• It is not necessary to wash the griddle after every use. When light
cooking is performed and AFTER the griddle has cooled, simply
wipe down the surface with a clean cloth or paper towel. The oils in
the food which cooked on the griddle surface will naturally season
the griddle providing a “natural” non-stick surface.
• After heavy cooking is completed and the griddle is still warm
enough to create steam, pour a small amount of club soda at room
temperature directly on the griddle. Using a metal spatula, pull oils
and food particles toward the trough in front. Wipe entire surface
with a paper towel. Follow with the seasoning process of applying oil.
• Keeping the griddle well seasoned will prevent the griddle from
developing surface rust. If the griddle is not used for a period of
time, it must be re-seasoned. The griddle must be re-seasoned each
time after it is washed.
• Non-stick cooking spray is not recommended as it contains a high
water content that has a tendency to burn quickly.
• Corn oil is not recommended as it has a high sugar level. It will
caramelize and burn on the surface making it very difficult to remove.
• After using the griddle, always remove the grease trough located in
the front. Simply pull the trough towards you and lift out. The trough
or tray trap needs to be cleaned after each use. A fire hazard may
occur if grease is accumulated in the trough.
• Note: It is normal for the griddle to darken over time. This is the sign
of a well seasoned griddle.
• Important: Never flood a hot griddle with cold water. This thermal
shock promotes griddle warping and can cause the griddle to crack if
continued over a period of time.
• For heavy duty cleaning, Viking offers a Griddle Cleaning Kit (model
#GCK). This fast and effective commercial grade cleaning system will
clean your griddle in a matter of minutes. To order, contact your local
Viking dealer or order on the Viking website at vikingrange.com.
Griddle Cooking Chart
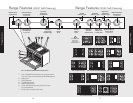
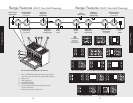
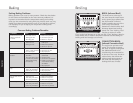
Char-Grill (on applicable models)
The optional 18,000 BTU char-grill is equipped with a single piece,
heavy-duty porcelainized cast-iron grill grate for easy movement of
grilling items. Beneath the grill grate are two slotted porcelainized
flavor generator plates which are designed to catch drippings and
circulate a smoke flavor back into the food. Beneath the flavor
generator plates is a two piece drip pan which catches any drippings
that might pass beyond the flavor generator plates. This unique grilling
system is designed to provide outdoor quality grilling indoors.
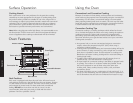
Char-Grill Assembly
Before using the char-grill, you will need to follow these steps to properly
assemble the char-grill.
• Remove the two flavor generator plates and grill grate from the
cardboard packaging.
• Position the flavor generator plates so that the tab on each plate is
inserted in the right, rear hole and left, front hole on the flavor
generator frame. (See char-grill assembly section on following pages.)
• After the flavor generator plates are properly located, place the grill
grate on top of the flavor generator plates. After this, the char-grill is
assembled and ready to use.
Char-Grill Operation
•Turn the overhead ventilation on prior to turning the grill on.
• Turn the grill knob counterclockwise to HI.
• Always preheat the grill for 5-10 minutes before placing food on the
grill grate.
• Place food items on the grill, cook as desired.
• To turn the grill off, turn the grill knob clockwise to the OFF position.
Char-Grill Cooking Tips
• When grilling chicken, roasts, well-done steaks or chops and thick
pieces of meat, sear on HI. Then, reduce the heat setting to prevent
excessive flare-up. This will allow the food to cook through without
burning the outside.
• After steaks, chops, or hamburgers have been allowed to sear for
approximately one minute, you may slide a spatula under the meat
and turn it approximately 90 degrees so that a waffle pattern will be
seared onto the food.
• Use a metal spatula instead of tongs or a fork to turn the meat. A
spatula will not puncture the meat allowing juices to escape.
• Turn the meat over only once. Juices are lost when steaks, chops or
hamburgers are turned several times. The best time to turn the meat
is after the juices have begun to bubble to the surface.