


6
WWW.VINOTEMP.COM
INSTALLATION INSTRUCTIONS
Before Using Your Ice Maker
• Remove all exterior and interior packing materials.
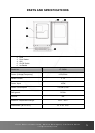
• Check to be sure you have all of the following parts:
• 1 Ice Bucket
• 1 Plastic Scoop
• 25 ft. hose
• 1 instruction manual
• Before connecting the ice maker to the power source, let it stand upright for
approximately 2 hours. This will reduce the possibility of a malfunction in the
cooling system from handling during transportation.
• Clean the interior surface and ice bucket with lukewarm water using a soft cloth.
Installation Of Your Ice Maker
• This appliance is designed to be recessed or built-in (fully recessed) or
freestanding.
• Place your ice maker on a flat surface that is strong enough to support the unit
when fully loaded.
• Level your ice maker by adjusting the legs at the front of the unit.
• Do not place the unit in a moist place. Too much moisture in the air will cause frost
to form quickly on the evaporator, requiring more frequent defrosting of the
appliance.
• Locate the ice maker away from direct sunlight and sources of heat (stove, heater,
radiator, etc.). Direct sunlight may affect the acrylic coating and heat sources may
increase electrical consumption. Extreme cold ambient temperatures may also
cause the ice maker not to perform properly.
• Position appliance to allow airflow through the front grill (see
SKETCH 1)
Connecting the Water Supply
Improper water line connection may result in flooding. You
must use a licensed plumber. Review state and local plumbing
codes before installation.
• Not all of the hardware necessary for installation has been provided. It is necessary
to hire a professional licensed plumber to complete the installation.
• Connect tubing (supplied with the unit) to the nearest cold water source. Connect
sufficient tubing to the unit to allow the appliance to be moved freely for cleaning
and service. Also, make sure that the tubing is not pinched or damaged during
transportation and installation.
SKETCH 1