


7
English6 English
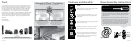
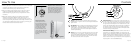
Figure B
Vornado V-Flow
™
Circulation
Typical Tower Fan
Typical tower fans oscillate due
to limited range of air movement.
You feel the airflow for only
seconds at a time.
Trust.
It is said that trust isn’t given, but earned. For decades Vornado has
been earning the trust of our customers by offering them only the
best. Vornado provides the highest level of performance, coupled
with the highest level of support available. Complete satisfaction
with no exceptions – this is Vornado’s promise to you. If you are
not satisfied for any reason, please contact us. Knowledgeable
representatives are available at 1-800-234-0604 from 7:00 AM to 6:00
PM CST. A wealth of additional support is also available online at
www.vornado.com. On behalf of myself and the entire staff at our
Andover, Kansas headquarters – thank you for selecting Vornado.
Sincerely,
Randy Brillhart
CEO, Vornado Air
Find our complete product line at www.vornado.com
N
O
O
S
C
I
L
L
A
T
I
O
N
N
E
E
D
E
D
With V-Flow™ Circulation
V-Flow™ Circulation is a wide
span of constant airflow that
allows a Vornado to provide true
whole room circulation.
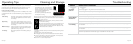
Maximize your cooling and heating efficiency.
Benefit
With push-button controls and multiple speeds,
any circulation need will be met.
Timer is easily set to turn off the unit in 1, 2, 4,
or 8 hours. Selected timer setting light will be
illuminated.
Solid base design eliminates the typical wobble
of common tower fans.
Remote control adds convenience, and stores
easily atop the fan using a magnetic cradle.
Saves energy by maximizing the performance
of cooling systems. When you use a Vornado
Tower Circulator, you will not have to set your
summertime thermostat as low.
Features and Benefits
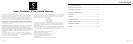
Tools Needed:
Phillips head screwdriver
Base Assembly Instructions
1. Assemble the two base halves together. Position the base
half with the alignment pin, over the other base half with the
alignment sockets. Press the two halves together until flush.
(See Figure A.)
2. Assemble the base to the tower bottom. With the Tower on
its side, align the 4 base sockets onto the Tower bottom pins.
Note; one of the 4 pins is “D” shaped to allow it to fit only
one way. With the base in position, secure the base bottom
to the tower with the 4 Phillip screws provided. Tighten the
screws securely but do not over tighten. (See Figure B)
Figure A