


– 6 –
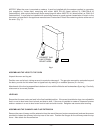
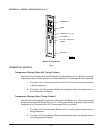
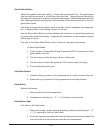
NOTICE: When the oven is mounted on casters, it must be installed with the casters supplied, a connector
(not supplied by Vulcan-Hart) complying with either ANSI Z21.69 (latest edition) or CAN/CGA-6.16
(latest edition), and a quick-disconnect device complying with either ANSI Z21.41 (latest edition) or CAN1-6.9
(latest edition). It must also be installed with restraining means to guard against transmission of strain to the
connector, as specified in the appliance manufacturer’s instructions. Attach the restraining device at the rear of
the oven. (Fig. 1).
CONNECT GAS
LINE STRAIN
RELIEF HERE
PL-51216
Fig. 1
ASSEMBLING THE LEGS TO THE OVEN
Unpack the oven and leg set.
Position oven on its back, taking care not to scratch or damage it. The gas pipe connection protrudes beyond
the back; provide for this when oven is tipped back by resting it on suitable spacers (2 x 4's etc.).
Attach each of the four leg assemblies to bottom of oven with the 24 bolts and lockwashers (6 per leg). Carefully
raise oven to its normal position.
LEVELING
Ensure that the oven racks are level in the final installed position. If the oven is installed on legs, turn adjustable
feet in or out to level oven front-to-back and side-to-side. If the oven is installed on casters, loosen set screws
and turn casters in or out to level oven front-to-back and side-to-side. Retighten set screws after leveling.
ASSEMBLING THE CHIMNEY AND FLUE EXTENSION
Remove the oven chimney and flue extension from the rear of the oven (motor compartment) and use the screws
provided to fasten the chimney to the top rear of the oven. Position the flanges on the chimney under the top
cover. Also attach the flue extension.