


– 11 –
LEVELING
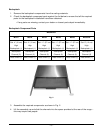
Check the leveling of the range. Place a carpenter’s level across the range top plates. Level front to
back and side to side.
To adjust the leveling, tilt the range to one side and, using channel locks, unscrew the adjustable leg
insert as required. Repeat this procedure as necessary for each leg.
GAS CONNECTIONS
CAUTION: All gas supply connections and any pipe joint compound used must be resistant to
the action of propane gases.
Connect gas supply. Make sure the pipes are clean and free of obstuctions.
Codes require that a gas shutoff valve be installed in the gas line ahead of the range.
Standard ranges are equipped with fixed burner orifices which coincide with installation elevation.
Install the gas pressure regulator.
Before installing, ensure that regulator supplied agrees with rating plate gas supply.
The gas pressure regulator is NOT factory installed. The
regulator for this gas type is sealed within a plastic bag
and packaged with the range. This regulator must be field
installed by a qualified installer.
Natural gas regulators are preset for 4.0" W.C. (Water
Column); propane gas regulators for 10.0" W.C.
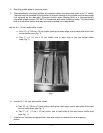
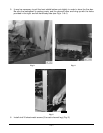
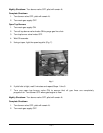
1. Locate
3
⁄4" (1.9 cm) gas connection pipe extending
from rear of range.
2. Cover pipe threads with leak sealant.
3. Screw regulator hand-tight onto pipe with
regulator arrow pointing towards range body
back (Fig. 6).
4. Using pipe wrench, tighten regulator securely in
an upright position (Fig. 6).
The arrow on the regulator shows the direction of the gas flow (Fig. 6). The pressure regulator must
be mounted horizontally to ensure proper preset outlet pressure. If the regulator is installed in any other
position, the outlet pressure must be reset for proper operation.
A leak limiter is supplied with every regulator to allow excess gas pressure to escape. Do not obstruct
leak limiter on gas pressure regulator, because obstruction may cause regulator to malfunction.
Fig. 6