


FULL SIZE ELECTRIC CONVECTION OVENS - ELECTRICAL OPERATION
F25105 (December 2001) Page 34 of 60
SEQUENCE OF OPERATION
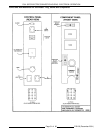
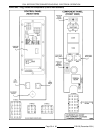
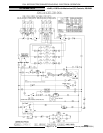
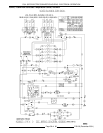
VC4ES, VC6ES with Mechanical KX Thermostat
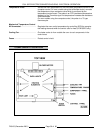
Schematic diagram 6532 will be used to explain the
electrical sequence of operation.
Cook Cycle
1. Conditions.
A. Oven connected to correct voltage and is
properly grounded.
B. Power switch (S1) OFF.
C. Temperature dial set to lowest
temperature (fully CCW).
D. High limit thermostat CLOSED.
E. Oven doors closed (door switch contacts
CLOSED).
F. Oven cavity temperature below 140°F.
2. Power switch (S1) turned ON.
A. Power ON light (Amber) comes ON.
B. 1CON coil energized.
C. Blower motor energized.
NOTE:
Motor speed (Hi/Low) depends on
position of fan speed switch (S3).
D. Component cooling fan energized.
E. Power to oven cavity light switch (S3) wire
#1. Turns cavity lights ON/OFF and does
not affect "Cook" cycle.
3. Set thermostat to desired "Cook" temperature
and thermostat CLOSES.
A. Heating light (Clear) comes ON.
B. 2CON coil energized.
1) Heating elements powered and
heating starts.
4. Oven reaches set temperature and thermostat
OPENS.
A. Heat light goes out.
B. 2CON coil de-energized.
1) Power removed from heating
elements and heating stops.
5. The oven will continue to cycle on the
thermostat until the doors are opened or the
power switch (S1) is turned to the OFF or
COOL DOWN position.
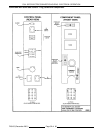
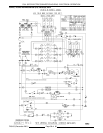
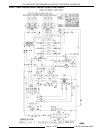
VC4ED, VC6ED with Solid State Temperature
Control
Schematic diagram 6534 will be used to explain the
electrical sequence of operation.
Cook Cycle
1. Conditions.
A. Oven connected to correct voltage and is
properly grounded.
B. Power switch (S1) OFF.
C. Temperature dial set to lowest
temperature (fully CCW).
D. High limit thermostat CLOSED.
E. Oven doors closed (door switch contacts
CLOSED).
F. Oven cavity temperature below 140°F.
2. Power switch (S1) turned ON.
A. Power ON light (Amber) comes ON.
B. 1CON coil energized.
C. Solid state temperature control energized.
1) Heating light (Clear) comes ON.
2) 2CON coil energized.
a. Heating elements powered and
heating starts.
D. Blower motor energized.
NOTE:
Motor speed (Hi/Low) depends on
position of fan speed switch (S3).
E. Component cooling fan energized.
F. Power to oven cavity light switch (S3) wire
#1. Turns cavity lights ON/OFF; does not
affect "Cook" cycle.
3. Set temperature dial to desired "Cook"
temperature.
4. Oven reaches set temperature.
A. Temperature control de-energizes internal
relay and the normally open (N.O.)
contacts OPEN.
1) Heat light goes out.
2) 2CON coil de-energized.
a. Power removed from heating
elements and heating stops.
5. The oven will continue to cycle on the
temperature control until the doors are opened
or power switch (S1) is turned to the OFF or
COOL DOWN position.