


– 38 –
CONFIGURATION MODE — MANUAL CONTROL (Standard or Deluxe)
WARNING: DISCONNECT THE ELECTRICAL POWER SUPPLY FROM THE OVEN AND
FOLLOW LOCKOUT / TAGOUT PROCEDURES.
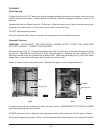
Identify the manufacturer(s) of the convection fan motor(s) by inspecting the label on the motor(s) after
the rear panel is removed. This information is needed for Steps 8 – 10. Replace rear panel and
reconnect electrical power.
Some of the procedures in this section are set at the factory and do not need to be re-valued. Only
steps 2, 6, and 7 must be completed at time of installation. Other values, if changed improperly, could
result in the oven not operating properly and may require a service technician.
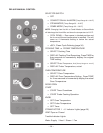
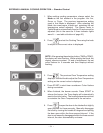
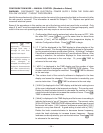
1. Configuration Mode can be entered only when the oven is OFF. With
the oven OFF, press
and at the same time for about three
seconds. [ Conf ] will be displayed in the temperature display to
indicate Configuration Mode. Press
TIME to begin.
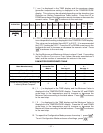
2. [ C F ] will be displayed in the TIME display to allow selection of the
temperature scale. Turn the adjustment knob clockwise for Fahrenheit;
turning counterclockwise would select Celsius. A blinking F indicates
Fahrenheit is selected while a blinking C would indicate Celsius. After
making a selection, the selection displays for three seconds and
automatically advances to the next step. Or, press
TIME to
advance to the next step.
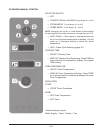
3. [ dSCL ] is displayed in the TIME display and the number of clean
cycles completed is displayed in the TEMPERATURE display. This
number cannot be changed or modified. Press
TIME to advance
to the next step.
4. The revision level of the control's software is displayed in the time
display and cannot be changed. This information is needed by your
service technician. Press
TIME to advance to the next step.
5. [ HHHH ] is displayed in the TIME display and the total cooking hours
of the oven is displayed in the temperature display. This can be reset.
Rotate the knob counterclockwise to decrease the number of hours;
rotate the knob clockwise to increase the number of hours . Press
TIME to advance to the next step.
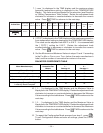
6. [ bbbb ] is displayed in the TIME display and the buzzer is sounding to
indicate the buzzer's "on-off" frequency selection. The numeric value
[000 to 255] in the TEMPERATURE display indicates the type of sound
the buzzer will make. [ 000 ] makes a continuous sound while [ 255 ]
beeps at a very slow interval. A good setting to start with is [ 050 ].
Rotate the knob counterclockwise to decrease buzzer frequency;
rotate the knob clockwise to increase buzzer frequency. Buzzer
loudness can be adjusted by your service technician. Press
TIME
to advance to the next step.
Pressing TIME
repeatedly advances
through each step 1
through 12 and then
repeats from step 2.
After any keystroke where
an individual setting is
either changed or
accepted, the setting will
display for three seconds
and then automatically
advances to the next step.