


- 4 -
The installation location must allow adequate clearances for servicing and proper
operation. While another gas-fired cheesemelter can be placed adjacent to this
Cheesemelter, there must be no obstruction to the front of the Cheesemelter. A minimum
front clearance of 36" (91 cm) is required.
Do not obstruct the flow of combustion and ventilation air. Adequate clearance for air
openings into the combustion chamber must be provided. Make sure there is an adequate
supply of air in the room to replace air taken out by the ventilating system.
Do not permit fans to blow directly at the Cheesemelter. Avoid wall-type fans which
create air cross currents within the room. Avoid open windows next to the Cheesemelter.
INSTALLATION CODES AND STANDARDS
The Cheesemelter must be installed in accordance with:
In the United States of America:
1. State and local codes.
2. National Fuel Gas Code, ANSI-Z223.1/NFPA #54 (latest edition). This shall include but
not be limited to: NFPA #54 Section 10.3.5.2 for Venting. Copies may be obtained
from The American Gas Association Accredited Standards Committee Z223, @ 400
N. Capital St. NW, Washington, DC 20001 or the Secretary Standards Council, NFPA,
1 Batterymarch Park Quincy, MA 02169-7471
3. NFPA Standard # 96 Vapor Removal from Cooking Equipment, latest edition, available
from the National Fire Protection Association, Batterymarch Park, Quincy, MA 02269.
In Canada:
1.Local codes.
2.CAN/CSA-B149.1 Natural Gas Installation Code (latest edition).
3.CAN/CSA-B149.2 Propane Installation Code (latest edition), available from The
Canadian Gas Association, 178 Rexdale Blvd., Etobicoke, Ontario, Canada M9W
1R3.
ASSEMBLY
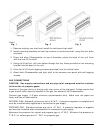
Cheesemelters Mounted on a Counter (Fig. 1)
Cheesemelters mounted on a counter must be equipped with 4" (10 cm) legs. The
countertop must be of noncombustible construction. Place Cheesemelter in position, then
level. Unscrew the front legs from the chassis about
1
/4" (6 mm) and remove the lower
control panel for servicing.
Cheesemelters Mounted on a Wall (Fig. 2)
Secure brackets to the wall by means of lag screws or bolts. Make sure Cheesemelter is
level and lag screws or bolts engage wall studs.
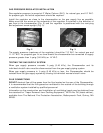
Cheesemelter Mounted on Special Hi-Shelf (Fig. 3)
If the Cheesemelter is to be mounted over a Gas Range, a reinforced hi-shelf and special
mounting brackets are required. These are furnished when ordered as an elevated
Cheesemelter.