


3
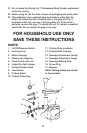
ASSEMBLING
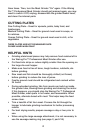
1. Make sure unit is unplugged while assembling.
2. Fit grinder/feeder head tightly into attachment opening. Holding
head with one hand, place locking knob into the hole on the side
of the motor housing and tighten knob by turning clockwise.
3. Place feed screw into grinder/feeder head, long end spindle first;
turn it slightly until it is set into motor housing.
4. NOTE: Position cutting blade onto feed screw shaft with the flat
cutting surface facing out from the geed screw. If it is not fitted
properly, meat will not be ground and the cutting plate may be
permanently damaged.
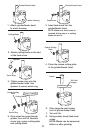
5. Position the desired cutting plate onto the flat sides of the cutting
blade. Ensure that the notch of the cutting plate fit into the tab of
the grinder/feeder head.
6. Secure screw ring to the end of the grinder/feeder head by
turning clockwise. Use spanner to secure screw ring.
7. Place large die-cast hopper on the grinder/feeder head.
8. Use the food pusher to gently feed food, one piece at
a time. Do not force the food into the grinder/feeder head.
HOW TO USE
1. Before first use, wash all parts of the Waring Pro™ Professional
Meat Grinder.
2. Place the Waring Pro™ Professional Meat Grinder on a stable
work surface.
3. Make sure the On/Off/Reverse Switch is in the Off position.
4. Insert plug into wall outlet.
5. Place a wide, shallow bowl or plate beneath the grinder tube to
catch food.
6. Switch appliance to On position. The Waring Pro™ Professional
Meat Grinder must ALWAYS be in the On position before adding
food.
7. Place food on the large die-cast hopper and use pusher to feed
food through opening.
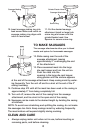
NOTE – REVERSE SWITCH
If the motor slows or stops, this may be due to jammed food.
Immediately switch the Waring Pro™ Professional Meat Grinder to its
Off position. To clear the feed screw, “pulse” the meat grinder in the
reverse direction by pressing the switch down and releasing it quickly