


4
fresh ingredients. The red on light will remain off and the display will reset to the default setting: basic/specialty, medium
crust, with 3:10 in display.
DO NOT COVER bread maker with anything during operation as this can cause malfunction.
DO NOT TOUCH control panel buttons after bread maker has been turned on as this can interrupt the cycle. Turn bread
maker off after completion of cycle.
DO NOT LEAVE bread maker plugged into electrical outlet when not in use to prevent it from being accidentally turned
on.
KNOW YOUR INGREDIENTS
Although bread making seems very basic, it is a science and the proportions of ingredients are critical. Read the following
information to better understand the importance each ingredient plays in the bread making process. Also, always make sure
your ingredients are fresh.
FLOUR is the main ingredient used in making bread and provides structure as well as food for the yeast. Several different
types of flour can be used in your bread maker, but DO NOT USE ALL-PURPOSE FLOUR, CAKE FLOUR OR SELF-
RISING FLOUR AS POOR RESULTS WILL BE OBTAINED.
BREAD FLOUR SHOULD be used in your bread maker as it contains more gluten-forming proteins than all-purpose flour
and will provide tall, well-formed loaves with good structure. Several different brands of bread flour are available for use in
your bread maker.
WHOLE WHEAT FLOUR can be used in your bread maker at the special whole wheat bread setting. Whole wheat flour
contains the entire wheat kernel, including the bran and germ, therefore, breads made with 100 percent or a high percentage
of whole wheat flour will be lower in height and heavier in texture than bread made with bread flour. The whole wheat
bread setting on your machine features longer knead time to better develop the structure of wheat breads for optimum
results.
RYE FLOUR can be used in combination with bread flour in the preparation of rye or pumpernickel bread. However, it
cannot be used alone as it does not contain enough protein to develop adequate gluten for structure.
SPECIAL NOTES ON FLOUR
How to make minor adjustments for dough: All flours are affected by growing conditions, milling, storage, humidity and
even the manufacturer. While not visibly different, you may need to make some minor adjustments when using different
brands of flour as well as compensating for the humidity in your area. Always store flour in an airtight container. Store
whole grain flours (whole wheat, rye) in a refrigerator to prevent them from becoming rancid.
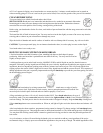
Measure the amount of flour as directed in each recipe but make any adjustment after the first 5 to 8 minutes of continuous
kneading. Feel free to check the condition of the dough by feeling it and looking at it during the knead cycle as this is
the only time you can make any minor adjustment that may be necessary as follow:
Open cover and touch dough. If it feels a little sticky and there is a slight smear under the knead bar, no adjustment is
necessary.
If dough is very sticky, clinging to the sides of the pan in one corner, and is more like a batter than a dough, add one-
tablespoon flour. Allow it to work in before making any further adjustment.
If dough is dry and the machine seems to be laboring during kneading, add one-teaspoon lukewarm water at a time. Once
again, allow it to work in before making any further adjustments.
You will know when the dough is just right near the end of the kneading cycle when it is soft to the touch, smooth in
appearance and just a bit sticky, leaving a slight residue on your fingers-the feel of perfect dough. The bottom of the bread
pan will also be clean of any dough residue.