8
Connecting the Refrigerator
to a Water Source
(on some models)
Read all directions carefully before you begin.
IMPORTANT:
■ All installations must be in accordance with local plumbing
code requirements.
■ Contact your dealer or Whirlpool designated service
company for proper installation and parts.
■ Connect to potable water only.
■ Water pressure: 30 to 150 psi (207 KPa - max. 1030 KPa).
■ Install ice maker tubing in areas where temperatures are
above freezing.
■ If operating the refrigerator before installing the water
connection, turn ice maker to the OFF position to prevent
operation without water (See “Water System Preparation”).
■ It may take up to 24 hours for your ice maker to begin
producing ice.
Water System Preparation
(on some models)
Please read before using the water system.
Immediately after installation, follow the steps below to make
sure that the water system is properly cleaned.
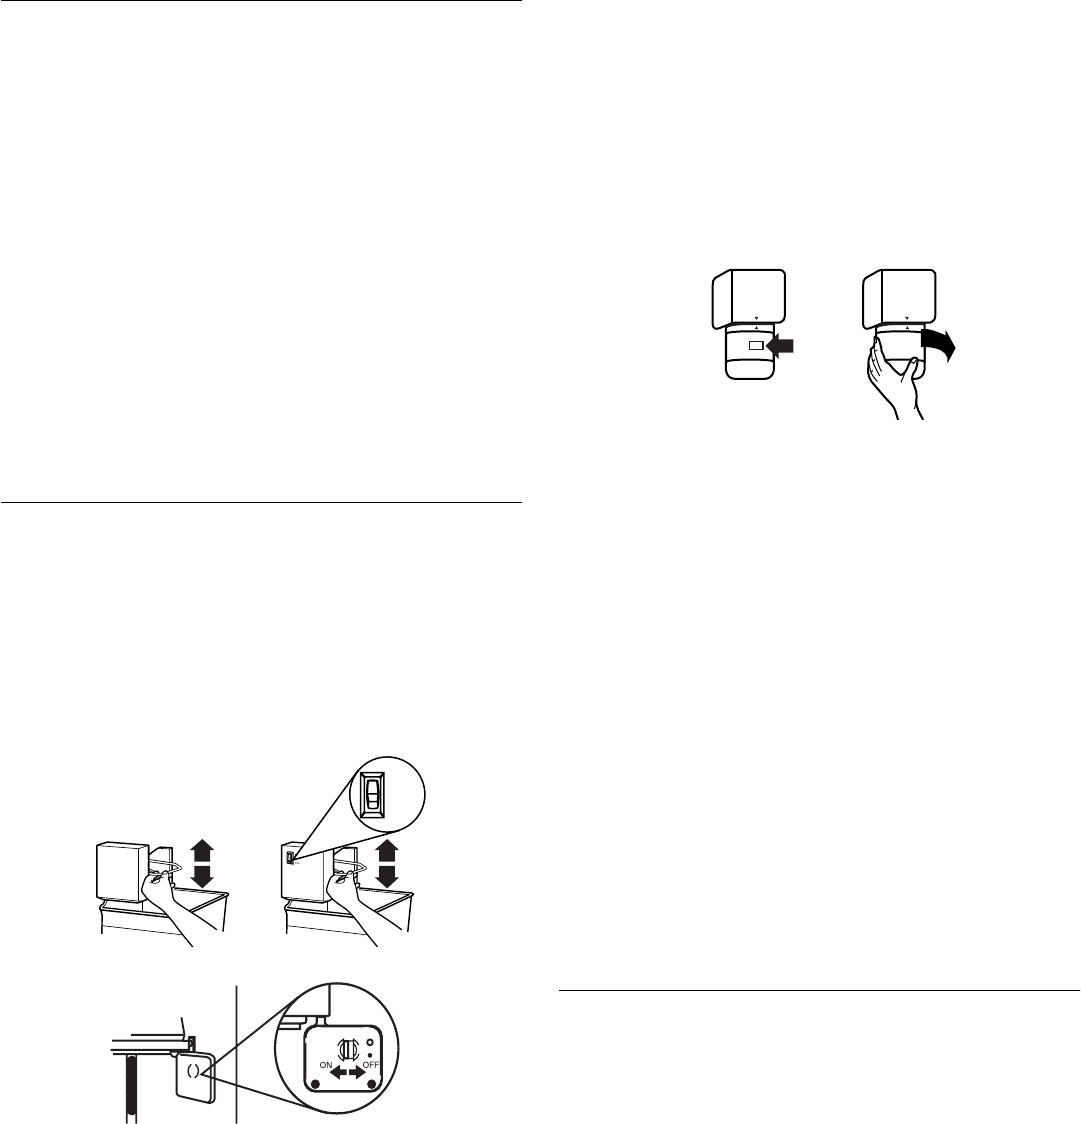
1.
Open the freezer door and turn off the ice maker. For
Style 1
lift up the wire shut-off arm as shown. For
Style 2
move the
switch to the OFF (right) setting as shown.
Style 1
Style 2
NOTE:
If your model has a base grille filter system, make sure the
base grille filter is properly installed and the cap is in the
horizontal position. If your model has an interior water filter
system, move to step 2.
2.
Install the interior water filter cartridge. The interior water filter
mounting bracket is located in the upper corner of the fresh
food compartment of the refrigerator.
NOTE: Do not use with water that is microbiologically
unsafe or of unknown quality without adequate
disinfection before or after the system.
■ Carefully remove the interior water filter cartridge from its
packaging. Remove the red cap from the cartridge.
■ Apply the appropriate month sticker to the cartridge as a
reminder to replace the cartridge within six months. Then
apply the “Water Filter Replacement Reminder” sticker to
your calendar.
■ Line up the INSTALL mark on the water filter label with the
indicator line that is molded into the filter mounting bracket
cover. Push the cartridge into the filter mounting bracket.
Twist the cartridge ¹⁄₄ turn to the right to lock it into place. The
REMOVE mark should be lined-up with the indicator line
located on the front cover.
3.
Flush the water system by dispensing and discarding
2 to 3 gallons (8 to12 liters) or approximately 6 to 7 minutes of
water through the dispenser. This will clean the system and
help clear air from the lines. Additional flushing may be
required in some households.
NOTE:
As air is cleared from the system, water may spurt out
of the dispenser.
4.
Inspect the filter system for water leaks. If you see water
leaks, see the “Troubleshooting” section.
5.
Open the freezer door and turn on the ice maker. For
Style 1
lower the wire shut-off arm. For
Style 2
move the switch to
the ON (left) position. Please refer to the “Ice Maker and
Storage Bin/Bucket” section for further instructions on the
operation of your ice maker.
■ Allow 24 hours to produce the first batch of ice.
■ Discard the first three batches of ice produced.
■ Depending on your model, you may want to select the
maximum ice feature to increase the production of ice. To
do so, set the switch on the front of the ice maker to MAX.
Understanding Sounds You May Hear
Your new refrigerator may make sounds that your old one didn’t
make. Because the sounds are new to you, you might be
concerned about them. Most of the new sounds are normal. Hard
surfaces, like the floor, walls, and cabinets, can make the sounds
seem louder than they actually are. The following describes the
kinds of sounds and what may be making them.
■ If
your product is equipped with an ice maker, you will hear a
buzzing sound when the water valve opens to fill the ice
maker for each cycle.
■ The defrost timer will click when the automatic defrost cycle
begins and ends. Also, the Thermostat Control (or
Refrigerator Control depending on the model) will click when
cycling on and off.
MAX
NORMAL


