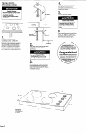
Whirlpool Cooktop Cooktop User Manual


5
Electrical
connection
Electrical Shock Hazard
Disconnect power before
servicing.
Electrically ground cooktop.
Failure to follow these instructions
can result in death, fire, or
electrical shock.
WARNING
Now start…
With cooktop in kitchen.
This cooktop must be connected to a
grounded, metallic permanent wiring
system or a ground connector should
be connected to the ground terminal or
wire lead on the cooktop.
This cooktop is manufactured with a
frame connected, green or bare ground
wire. Connect the cooktop cable to the
junction box through the U.L.- or CSA-
listed conduit connector. Complete
electrical connection according to local
codes and ordinances.
connector. Tighten screws on conduit
connector.
3. Connect the green (or bare)
appliance cable wire with the neutral
(white) wire in the junction box using
twist-on connector.
4. Connect the two black wires together;
then connect the two red wires
together with twist-on connector. (See
Figure 2.)
B.Where local codes Do Not
permit connecting the frame-ground
conductor to the neutral (white) junction
box wire: (Used for all Canadian
installations)
cable from power supply
junction box
black wires
twist-on
connectors
U.L.- or C.S.A.- listed
conduit connector
cable from cooktop
bare or
green wire
white wire
red wires
junction box
cable from power supply
twist-on
connector
black wires
U.L.- or C.S.A.- listed
conduit connector
cable from cooktop
bare or green
wires
white wire
red wires
A.Where local codes permit
connecting the frame-ground conductor
to the neutral (white) junction box wire:
(Not used for Canadian installations)
Grounded neutral – Figure 2
1. Disconnect power supply.
2. Connect the flexible, armored cable
from the cooktop to the junction box
using a U.L.- or CSA-listed conduit
Ungrounded neutral – Figure 3
1. Disconnect power supply.
2. Connect the flexible, armored cable
from the cooktop to the junction box
using a U.L.- or CSA-listed conduit
connector. Tighten screws on conduit
connector.
3. Connect the two black wires together;
then connect the two red wires
together using twist-on connector.
(See Figure 3.)
4. Connect the green or bare ground
wire from the appliance cable to the
grounded wire in the junction box or
other grounded connector using twist-
on connector.
5. Put a twist-on connector on end of
white wire.
1.Remove the shipping materials
and tape from the cooktop. Remove the
hardware package from inside the
literature bag.
Excessive Weight Hazard
Use two or more people to move
and install cooktop.
Failure to do so can result in back
or other injury.
WARNING
attachment
screw
burner box
bottom
bracket (end
locations
recommended)
attachment screws
for optional front
and back location
“U” shaped spring
clip or small
diameter hole
Standard cooktop shown. See specific
instructions for installing brackets on Lift Top
models.
2.Two clamp brackets are provided
to clamp the cooktop to the countertop.
Install the clamp brackets on each end
of the burner box bottom. Optional: If
cabinet construction does not provide
clearance for installing brackets at
burner box ends, install the brackets on
the front and back of the burner box
bottom.
The brackets may be installed before
(see Step 2a) or after (see Step 2b) the
cooktop is placed into the cutout. Note:
Step 2B is not recommended for Lift
Top models.
2a.If installing before the
cooktop is placed into cutout:
• Remove elements and burner bowls.
• Place the cooktop upside down on a
protective surface (blanket, pad). For
Lift Top models: Place the cooktop
right side up on the protective surface.