


16
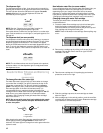
Utility or Egg Bin
(on some models - Accessory)
Depending on your model, you may have a one piece utility bin or
a three piece egg bin. To use the three piece egg bin, remove the
cover and place the eggs in the egg tray. Replace cover and store
on an interior refrigerator shelf. If you prefer, you can remove the
egg tray and place the entire carton of eggs in the bin. Replace
the cover.
NOTE: Eggs should be stored in a covered container. If your
model does not have an egg bin or covered utility bin, store
eggs in their original container on an interior shelf.
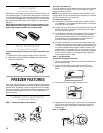
Wine or Can/Bottle Rack
(on some models - Accessory)
To remove and replace the wine rack (left) or can/bottle rack
(right):
1. Remove the rack by pulling it straight out from the shelf.
2. Replace the rack by sliding it in between the shelf and the
wall of the refrigerator.
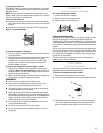
FREEZER FEATURES
Your model may have some or all of these features. Features that
can be purchased separately as product accessories are labeled
with the word “Accessory.” Not all accessories will fit all models.
If you are interested in purchasing one of the accessories, please
call the toll-free number on the cover or in the “Assistance or
Service” section.
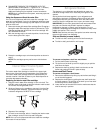
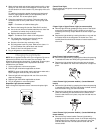
Ice Maker and Storage Bin/Bucket
(on some models - Accessory)
Style 1 - Normal and Maximum Ice Maker
To turn the ice maker on:
The on/off switch for the ice maker is a wire shut-off arm located
on the side of the ice maker. To turn the ice maker on, simply
lower the wire shut-off arm.
NOTE: The ice maker will not make ice until the freezer is cold
enough. Allow 24 hours to produce the first batch of ice. Discard
the first three batches of ice produced.
To turn the ice maker off:
■ Automatic turn off: As ice is made, the ice cubes will fill the
ice storage bin. The ice cubes will raise the wire shut-off arm
to the OFF (arm up) position.
■ Manual turn off: Lift the wire shut-off arm to the OFF (arm up)
position and listen for the click to make sure the ice maker
will not continue to operate.
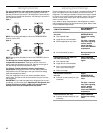
■ To increase ice production rate: Maximum Ice Production (on
some models): In maximum ice production, the ice maker
should produce approximately 10 to 14 batches of ice in a
24-hour period. If your refrigerator has the maximum ice
production feature, push the switch to MAX.
■ Normal Ice Production: In normal ice production mode, the
ice maker should produce approximately 7 to 9 batches of ice
in a 24-hour period. If ice is not being made fast enough, turn
the Freezer Control toward a higher (colder) number in half
number steps. (For example, if the control is at 3, move it to
between 3 and 4.) Wait 24 hours and, if necessary, gradually
turn the Freezer Control to the highest setting, waiting 24
hours between each increase.
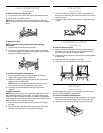
Style 1 - Ice Storage Bin
To remove and replace the ice bin:
1. Pull the covering panel out from the bottom and then slide it
back toward the rear.
2. Lift the wire shut-off arm so it clicks into the OFF (up)
position. Ice can still be dispensed, but no more can be
made.
3. Lift up the front of the storage bin and pull it out.
4. Replace the bin by pushing it in all the way or the dispenser
will not work. Push the wire shut-off arm down to the ON
position to restart ice production. Make sure the door is
closed tightly.
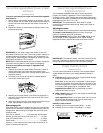
Style 2 - Ice Maker
MAX
NORMAL