


19
1
N
O
T
C
H
:
5
˚
F
COOLER
HOTTER
L
O
O
S
E
N
S
C
R
E
W
S
A
N
D
R
O
T
A
T
E
L
O
O
S
E
N
S
C
R
E
W
S
A
N
D
R
O
T
A
T
E
1
N
O
T
C
H
:
5
˚
F
HOTTER
COOLER
1
N
O
T
C
H
:
5
˚
F
COOLER
HOTTER
1
N
O
T
C
H
:
5
˚
F
COOLER
HOTTER
L
O
O
S
E
N
S
C
R
E
W
S
A
N
D
R
O
T
A
T
E
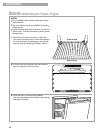
A
DJUSTING
THE
OVEN
TEMPERATURE
CONTROL
(
MODELS
FEP
310
G
,
FEP
320
G
,
FEP
330
G
)
O
F
F
B
R
O
I
L
5
0
0
4
5
0
4
0
0
3
5
0
3
0
0
2
5
0
2
0
0
1
5
0
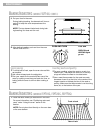
Notches
Locking
screws
Notches Tooth
Skirt
To lower
To raise
Locking
screws
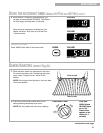
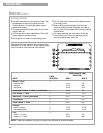
Although your new oven is properly adjusted to
provide accurate temperatures, it may cook faster
or slower than your old oven.
If you are not satisfied with the baking/roasting
results, you can change the temperature calibration
by following the steps below.
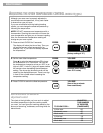
NOTE: DO NOT measure the oven temperature with
a thermometer. Opening the oven door will lower
the oven temperature and give you an incorrect
reading. Also, the thermometer temperature reading
will change as your oven cycles.
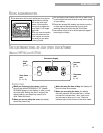
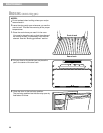
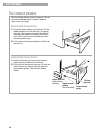
1. Make sure the oven temperature control knob is
turned to the off position. Pull the knob straight
off and flip it over.
2. Loosen the locking screws inside the
control knob.
Note the position of the notches.
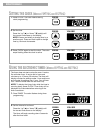
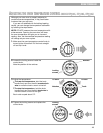
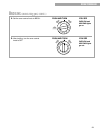
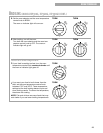
3. Adjust the temperature.
•
To lower the temperature, hold the knob
handle firmly and turn the skirt counterclock-
wise to move the tooth a notch to the left.
•
To raise the temperature, hold the knob
handle firmly and turn the skirt clockwise to
move the tooth a notch to the right.
Each notch equals about 5°F.
4. Tighten the locking screws and replace the
control knob.
USING YOUR RANGE
O
F
F
B
R
O
I
L
5
0
0
4
5
0
4
0
0
3
5
0
3
0
0
2
5
0
2
0
0
1
5
0