


15
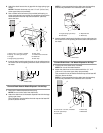
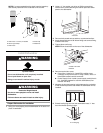
5. Using ⁵⁄₈" or ⁷⁄₈" I.D. hose and a coupler, connect the 2 drain
hose ends with hose clamps.
6. Connect the drain hose to the air gap, waste tee or disposal
with clamps.
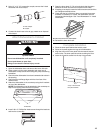
Attach Dishwasher to Cabinet
1. Open the dishwasher door and remove the lower dish rack.
2. Place a towel over the pump assembly and spray arm of
dishwasher to keep screws from falling into pump area during
installation.
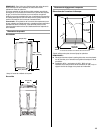
3. Check that the dishwasher is level and centered side to side in
the opening.
4. Check that the tub flange aligns with the front face of the
cabinet frame.
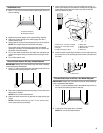
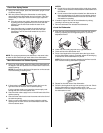
5. Attach the dishwasher to the countertop using the 2 brackets
on top of the dishwasher.
NOTE: The dishwasher must be attached to the countertop to
keep it from tipping when the door is opened.
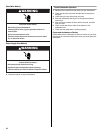
6. Insert 2 #8 x ⁵⁄₈" Phillips flat-head screws through the brackets
and into the countertop.
7. Open the door about 3" (7.6 cm) and check that the space
between the inner door and tub is equal on both sides.
8. If spacing is not equal, loosen the bracket screws and shift the
tub. Retighten bracket screws.
9. Check that the top of the door does not contact the screws,
brackets or countertop. If it does, the dishwasher must be
lowered and leveled again. See “Level Dishwasher” in “Install
Dishwasher.”
10. Remove towel from dishwasher.
11. Reinstall the lower dish rack.
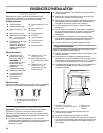
Complete Installation
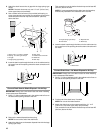
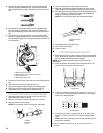
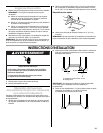
1. Place the lower panel behind the toekick panel.
2. Place the 2 panels against the legs of the dishwasher.
3. Align the slots on the inner panel with the toekick bracket
screw holes. The lower panel should be touching the floor.
4. Insert the 4 toekick screws into the top 4 screw holes.
A. Hose clamps
B. Coupler
A. Brackets
A
A
B
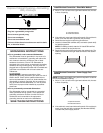
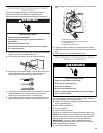
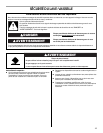
WARNING
Tip Over Hazard
Do not use dishwasher until completely installed.
Do not push down on open door.
Doing so can result in serious injury or cuts.
A
A. Top 4 screw holes
B.2-piece toekick
A
B