


9
9
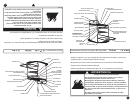
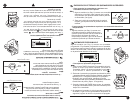
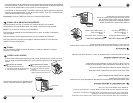
Some models (see page 2) have broiler in the
bottom of the range.
To use the broiler you should turn on the oven
as indicated on page 8,
the knob must be as
shown in the figure. The oven should be empty.
Choose the position to use the broiler tray.
- Top position for broiling.
- Medium position for browning.
- Low position for melting.
Algunos modelos (ver Pag. 2) cuentan con
asador en la parte inferior de la estufa.
Para que el asador funcione debe encender
el horno como se indica en la Pag. 8, la perilla
debe estar en la posición que indica la figura.
El horno debe estar vacío.
Seleccione la posición donde desea utilizar
la charola.
- Posición alta para asar.
- Posición media para dorar.
- Posición baja para gratinar.
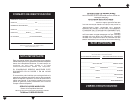
ASADOR
BROILER
Knob position to use the broiler.
Posición de la perilla para usar el
asador.
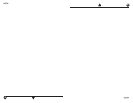
DIGITAL CLOCK / TIMER
RELOJ / TIMER DIGITAL
Algunos modelos cuentan con
reloj/ timer digital ( Ver pág. 2)
1. Boton del reloj
2. Pantalla
electrónica.
3. Botón para
aumentar
4. Botón para
reducir
5. Botón del
temporizador
Pantalla
Al conectar la elecricidad a la cocina por primera vez, aparecerá en la pantalla 12:00.
Cuando en cualquier otra ocación aparece 12:00 significa que ha ocurrido un corte de
elecricidad. Para volver a poner la hora en el reloj, vea la sección Clock (reloj)
Cuando el Temporizador no esta en uso la pantalla mostrara la hora del día.
Reloj
Éste es un reloj de 12 horas y no muestra a.m. o p.m.
Para poner la hora:
Antes de poner el reloj a la hora, asegúrese de que el temporizador se encuentre desactivado.
1. Presione CLOCK (reloj).
El indicador se encenderá intermitente cuando se esta programando el reloj.
2. Presione los botones con flechas hacia arriba ( ) o hacia abajo ( ) hasta que la
hora correcta del dia aparezca
en la pantalla. Se podrá
cambiar la hora haciendo el ajuste
por segundos o por intervalos de 10 minutos presionando el botón rápidamente o
presionándolo más largamente.
3. Presione CLOCK. El indicador intermitente se apagará indicando que se ha activado
el reloj.
Temporizador
El temporizador puede ser fijado en minutos y segundos
u horas y minutos hasta 11 horas
59 minutos, y hace la cuenta regresiva del tiempo fijado. El temporizador no pone en marcha
el horno ni lo detiene.
Para fijar:
1. Presione TIMER (temporizador)
La señal indicadora centelleará
durante la programación del temporizador.
2. Presione los botones con las flechas ( ) o ( ) para fijar la duración del tiempo.
3. Presione TIMER.
El temporizador comenzará a hacer la cuenta regresiva 5 segundos después de que se
ponga a funcionar.
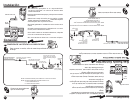
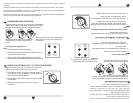
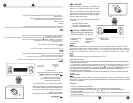
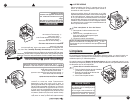
Some models have Digital Clock/Timer
(See page 2)
1. Clock
2. Display.
3. Increase
4. Decrease
5. Timer
Display
When power is first supplied to the range, 12.00 will appear on the display.
Any other time 12:00 appears, a power failure has occurred.
Reset the Clock. See Clock section.
Any time the timer is not in use, the display will show the time of day.
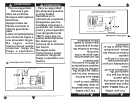
Clock
This is a 12 hour clock and does not show a.m. or p.m.
To set:
Before setting, make sure the Timer is off.
1. Press CLOCK.
The colon will flash during Clock programming.
2. Press the up ( ) or down ( ) arrow pads to set the time of day.
The time can be changed in either small or 10 minute increments by pressing a pad briefly or by
pressing and holding a pad.
3. Press CLOCK. The colon will stop flashing when the Clock is active.
Timer
The Timer can be set in minutes and seconds or hours and minutes up to 11 hours, 59 minutes, and
counts down the set time. The Timer does not start or stop the oven.
To Set:
1. Press TIMER.
The colon will flash during Timer programming.
2. Press the ( ) or ( ) arrow pads to set length of time.
3. Press TIMER.
The timer will begin counting down 5 seconds after the time is set.
CLO
CK
TIM
ER
Tim
er
1
2
5
3
4
CLO
CK
TIM
ER
Tim
er
1
2
5
3
4
BROIL
STM
0
0560 R
.0
BROIL
STM
00560 R.0